TinyLab

Keep eyes on the star and feet on the ground.


  • 首页

  • 归档

  • 分类

  • 标签

initramfs 简介,一个新的 initial RAM disks 模型

发表于 2009-02-06   |   分类于 Linux

译自: http://linuxdevices.com/articles/AT4017834659.html (by Rob Landley, TimeSys (Mar. 15, 2005))

问题

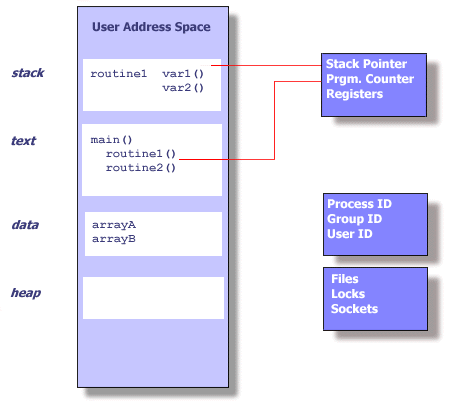
当 Linux 内核启动系统时,它必须找到并执行第一个用户程序,通常是 init。用户程序存在于文件系统,故 Linux 内核必须找到并挂载上第一个(根)文件系统,方能成功开机。

通常,可用的文件系统都列在 /etc/fstab,所以 mount 可以找到它们。但 /etc/fstab 它本身就是一个文件,存在于文件系统中。找到第一个文件系统成为鸡生蛋蛋生鸡的问题,而且为了解决它,内核开发者建立内核命令列选项 root=,用来指定 root 文件系统存在于哪个设备上。

十五年前,root= 很容易解释。它可以是软盘或硬盘上的分区。如今 root 文件系统可以存在于各种不同类型的硬件(SCSI, SATA, flash MTD) ,或是由不同类型硬件所建立的 RAID 上。它的位置随着不同启动而不同,像可热插拔的 USB 设备被插到有多个 USB 孔的系统上 - 当有多个 USB 设备时,哪一个是正确的?root 文件系统也可能被压缩(如何?),被加密(用什么 keys?),或 loopback 挂载(哪里?)。它甚至可以存在外部的网络服务器,需要内核去取得 DHCP 地址,完成 DNS lookup,并登入到远程服务器(需账号及密码),全部都在内核可以找到并执行第一个 userspace 程序之前。

如今,root= 已没有足够的信息。即使将所有特殊案例的行为都放进内核也无法帮助设备列举,加密,或网络登入这些随着系统不同而不同的系统。更糟的是,替核心加入这些复杂的工作,就像是用汇编语言写 web 软件 :可以做到,但使用适当的工具会更容易完成。核心是被设计成服从命令,而不是给命令。

为了这个不断增加复杂度的工作, 核心开发者决定去寻求更好的方法来解决这整个问题。

解决方法

Linux 2.6 核心将一个小的 ram-based initial root filesystem(initramfs) 包进内核,且若这个文件系统包含一个程序 init,核心会将它当作第一个程序执行。此时,找寻其它文件系统并执行其它程序已不再是内核的问题,而是新程序的工作。

initramfs 的内容不需是一般功能。若给定系统的 root 文件系统存在于一个加密过的网络块设备,且网络地址、登入、加密都存在 USB 设备 “larry” (需密码方能存取)里,系统的 initramfs 可以有特殊功能的程序,它知道这些事,并使这可以运作。

对系统而言,不需要很大的 root 文件系统,也不需要寻址或切换到任何其它 root 文件系统。

这跟 initrd 有何不同?

Linux kernel 已经有方法提供 ram-based root filesystem,initrd 机制。对 2.4 及更早的 kernel 来说,initrd 仍然是唯一的方法去做这一连串的事。但 kernel 开发者选择在 2.6 实现一个新的机制是有原因的。

ramdisk vs ramfs

ramdisk (如 initrd) 是 基于ram的块设备,这表明它是一块固定大小的内存,它可以被格式化及挂载,就像磁盘一样。这表明 ramdisk 的内容需先格式化并用特殊的工具(像是 mke2fs 及 losetup)做前置作业,而且如同所有的块设备,它需要文件系统驱动程序在执行时期解释数据。这也有人工的大小限制不论是浪费空间(若 ramdisk 没有满,已被占用的额外的内存也不能用来做其它事)或容量限制(若 ramdisk 满了,但其它仍有闲置的内存,也不能不经由重新格式化将它扩展)。

但 ramdisk 由于缓冲机制(caching)实际上浪费了更多内存。Linux 被设计为将所有的文件及目录做缓存,不论是对块设备的读出或写入,所以 Linux 复制数据到 ramdisk及从 ramdisk 复制数据出来,page cache 给 file data 用,而 dentry cache 给目录用。ramdisk 的下面则伪装为块设备。

几年前,Linus Torvalds 有一个巧妙的想法:Linux 的缓存是否可以被挂载一个文件系统?只要保持文件在缓存中且不要将它们清除,直到它们被删除或系统重新启动?Linus 写了一小段程序将缓存包起来,称它为 ramfs,而其它的 kernel 开发者建立一个加强版本称为 tmpfs(它可以写数据到 swap,及限制挂载点的大小,所以在它消耗完所有可用的内存前它会填满)。initramfs 就是 tmpfs 的一个实例。
这些基于ram的文件系统自己改变大小以符合数据所需的大小。增加文件到 ramfs(或增大原有的文件)会自动配置更多的内存,并删除或截去文件以释放内存。在块设备及缓存间没有复制动作,因为没有实际的块设备。在缓存中的只是数据的复制。更好的是这并不是新的程序代码,而是已存在的 Linux 缓存程序代码新的应用,这表示它几乎没有增加大小,非常简单,且基于已经历测试的基础上。

系统使用 initramfs 作为它的 root 文件系统甚至不需要将文件系统驱动程序内建到 kernel,因为没有块设备要用来做文件服务器。只是存在内存中的文件罢了。

initrd vs initramfs

底层架构的改变是 kernel 开发者建立一个新的实现的理由,但当他们在那里时他们清除了很多不好的行为及假设。
initrd 被设计为旧的 root= 的 root 设备检测程序代码的前端,而不是取代它。它执行 /linuxrc,这被用来完成设定功能(像是登入网络,决定哪个设备含有 root 分区,或用文件做为 loopback 设备),告诉 kernel 哪个块设备含有真的 root 设备(通过写入de_t 数据到 /proc/sys/kernel/real-root-dev),且回传给 kernel,所以 kernel 可以挂载真的 root 设备及执行真的 init 程序。

这里假设“真的根设备”是块设备而不是网络共享的,同时也假设 initrd 自己不是做为真的 root 文件系统。kernel 也不会执行 /linuxrc 而做为特殊的进程(ID=1),因为这个 process ID(它有特殊的属性,像是做为唯一无法被以 kill -9 的 process) 被保留给 init,kernel 在它挂载真的 root 文件系统后会等它执行。

用 initramfs,kernel 开发者移除所有的假设。当 kernel 启动了在 initramfs 外的 /init,kernel 即做好决定并回去等待接受命令。用 initramfs,kernel 不需要关心真的 root 档案系统在哪里,而在 initramfs 的 /init 被执行为真的 init,以 PID 1。(若 initramfs 的 init 需要不干涉特别的 PID 给其它程序,它可以用 exec() 系统呼叫,就像其它人一样)

总结

传统的 root= kernel 命令列选项仍然被支持且可用。但在开发支持initial RAM disk支持内核时,提供了许多优化和灵活性。

译者注

查看initramfs的内容

# mkdir initrd
# cd intrd
# cp /boot/initrd.img initrd.img
# gunzip initrd.img
# cpio -i --make-directories < initrd.img
#

创建initramfs

a. mkinitramf

# mkinitramfs -o /boot/initrd.img 2.6.2

Note: 2.6.25是需要创建initramfs的kernel版本号,如果是给当前kernel制作initramfs,可以用uname -r查看当前的版本号。提供kernel版本号的主要目的是为了在initramfs中添加指定kernel的驱动模块。mkinitramfs会把/lib/modules/${kernel_version}/ 目录下的一些启动会用到的模块添加到initramfs中。

b. update-initramfs

更新当前kernel的initramfs

# update-initramfs -u

在添加模块时,initramfs tools只会添加一些必要模块,用户可以通过在/etc/initramfs-tools/modules文件中加入模块名称来指定必须添加的模块。

命令:mkinitramfs, update-initramfs

mkinitcpio

在Arch Linux中,有一个新一代的initramfs制作工具。相对于老的mkinitrd和mkinitramfs,它有以下很多优点。查看详细《使用mkinitcpio》。

参考链接:

  • 精通initramfs构建 http://linuxman.blog.ccidnet.com/blog-htm-do-list-uid-60710-type-blog-dirid-14402.html
  • 制作initramfs镜像 http://www.diybl.com/course/6_system/linux/Linuxjs/200888/135080.html

原文如下:


The problem. (Why “root=” doesn’t scale.)

When the Linux kernel boots the system, it must find and run the first user program, generally called “init”. User programs live in filesystems, so the Linux kernel must find and mount the first (or “root”) filesystem in order to boot successfully.

Ordinarily, available filesystems are listed in the file /etc/fstab so the mount program can find them. But /etc/fstab is itself a file, stored in a filesystem. Finding the very first filesystem is a chicken and egg problem, and to solve it the kernel developers created the kernel command line option “root=”, to specify which device the root filesystem lives on.

Fifteen years ago, “root=” was easy to interpret. It was either a floppy drive or a partition on a hard drive. These days the root filesystem could be on dozens of different types of hardware (SCSI, SATA, flash MTD), or even spread across several of them in a RAID. Its location could move around from boot to boot, such as hot pluggable USB devices on a system with multiple USB ports – when there are several USB devices, which one is correct? The root filesystem might be compressed (how?), encrypted (with what keys?), or loopback mounted (where?). It could even live out on a network server, requiring the kernel to acquire a DHCP address, perform a DNS lookup, and log in to a remote server (with username and password), all before the kernel can find and run the first userspace program.

These days, “root=” just isn’t enough information. Even hard-wiring tons of special case behavior into the kernel doesn’t help with device enumeration, encryption keys, or network logins that vary from system to system. Worse, programming the kernel to perform these kind of complicated multipart tasks is like writing web software in assembly language: it can be done, but it’s considerably easier to simply use the proper tools for the job. The kernel is designed to follow orders, not give them.

With no end to this ever-increasing complexity in sight, the kernel developers decided to back up and find a better way to deal with the whole problem.

The solution

Linux 2.6 kernels bundle a small ram-based initial root filesystem into the kernel, and if this filesystem contains a program called “/init” the kernel runs that as its first program. At that point, finding some other filesystem containing some other program to run is no longer the kernel’s problem, but is now the job of the new program.

The contents of initramfs don’t have to be general purpose. If a given system’s root filesystem lives on an encrypted network block device, and the network address, login, and decryption key are all to be found on a USB device named “larry” (which requires a password to access), that system’s initramfs can have a special-purpose program that knows all about that, and makes it happen.

For systems that don’t need a large root filesystem, there’s no need to locate or switch to any other root filesystem.

How is this different from initrd?

The linux kernel already had a way to provide a ram-based root filesystem, the initrd mechanism. For 2.4 and earlier kernels, initrd is still the only way to do this sort of thing. But the kernel developers chose to implement a new mechanism in 2.6 for several reasons.

ramdisk vs ramfs

A ramdisk (like initrd) is a ram based block device, which means it’s a fixed size chunk of memory that can be formatted and mounted like a disk. This means the contents of the ramdisk have to be formatted and prepared with special tools (such as mke2fs and losetup), and like all block devices it requires a filesystem driver to interpret the data at runtime. This also imposes an artificial size limit that either wastes space (if the ramdisk isn’t full, the extra memory it takes up still can’t be used for anything else) or limits capacity (if the ramdisk fills up but other memory is still free, you can’t expand it without reformatting it).

But ramdisks actually waste even more memory due to caching. Linux is designed to cache all files and directory entries read from or written to block devices, so Linux copies data to and from the ramdisk into the “page cache” (for file data), and the “dentry cache” (for directory entries). The downside of the ramdisk pretending to be a block device is it gets treated like a block device.

A few years ago, Linus Torvalds had a neat idea: what if Linux’s cache could be mounted like a filesystem? Just keep the files in cache and never get rid of them until they’re deleted or the system reboots? Linus wrote a tiny wrapper around the cache called “ramfs”, and other kernel developers created an improved version called “tmpfs” (which can write the data to swap space, and limit the size of a given mount point so it fills up before consuming all available memory). Initramfs is an instance of tmpfs.

These ram based filesystems automatically grow or shrink to fit the size of the data they contain. Adding files to a ramfs (or extending existing files) automatically allocates more memory, and deleting or truncating files frees that memory. There’s no duplication between block device and cache, because there’s no block device. The copy in the cache is the only copy of the data. Best of all, this isn’t new code but a new application for the existing Linux caching code, which means it adds almost no size, is very simple, and is based on extremely well tested infrastructure.

A system using initramfs as its root filesystem doesn’t even need a single filesystem driver built into the kernel, because there are no block devices to interpret as filesystems. Just files living in memory.

Initrd vs initramfs

The change in underlying infrastructure was a reason for the kernel developers to create a new implementation, but while they were at it they cleaned up a lot of bad behavior and assumptions.

Initrd was designed as front-end to the old “root=” root device detection code, not a replacement for it. It ran a program called “/linuxrc” which was intended to perform setup functions (like logging on to the network, determining which of several devices contained the root partition, or associating a loopback device with a file), tell the kernel which block device contained the real root device (by writing the de_t number to /proc/sys/kernel/real-root-dev), and then return to the kernel so the kernel could mount the real root device and execute the real init program.

This assumed that the “real root device” was a block device rather than a network share, and also assumed that initrd wasn’t itself going to be the real root filesystem. The kernel didn’t even execute “/linuxrc” as the special process ID 1, because that process ID (and its special properties like being the only process that can not be killed with “kill -9”) was reserved for init, which the kernel was waiting to run after it mounted the real root filesystem.

With initramfs, the kernel developers removed all these assumptions. Once the kernel launches “/init” out of initramfs, the kernel is done making decisions and can go back to following orders. With initramfs, the kernel doesn’t care where the real root filesystem is (it’s initramfs until further notice), and the “/init” program from initramfs is run as a real init, with PID 1. (If initramfs’s init needs to hand that special Process ID off to another program, it can use the exec() syscall just like everybody else.)

Summary

The traditional root= kernel command-line option is still supported and usable, but new developments in the types of initial RAM disks supported by the kernel provide many optimizations and much-needed flexibility for the future of the Linux kernel. The next article in this series, available in next month’s issue of TimeSource, explains how you can start making the transition to the new initramfs initial RAM disk mechanism.

POSIX多线程程序设计

发表于 2009-02-05   |   分类于 Linux开发

目录

  1. 摘要
  2. 译者序
  3. Pthreads 概述
    3.1 什么是线程?
    3.2 什么是Pthreads?
    3.3 为什么使用Pthreads?
    3.4 使用线程设计程序
  4. Pthreads API编译多线程程序
  5. 线程管理
    5.1 创建和终止线程
    5.2 向线程传递参数
    5.3 连接(Joining)和分离(Detaching)线程
    5.4 栈管理
    5.5 其它函数
  6. 互斥量(Mutex Variables)
    6.1 互斥量概述
    6.2 创建和销毁互斥量
    6.3 锁定(Locking)和解锁(Unlocking)互斥量
  7. 条件变量(Condition Variable)
    7.1 条件变量概述
    7.2 创建和销毁条件变量
    7.3 等待(Waiting)和发送信号(Signaling)
  8. 没有覆盖的主题
  9. Pthread 库API参考
  10. 参考资料

1. 摘要

在多处理器共享内存的架构中(如:对称多处理系统SMP),线程可以用于实现程序的并行性。历史上硬件销售商实现了各种私有版本的多线程库,使得软件开发者不得不关心它的移植性。对于UNIX系统,IEEE POSIX 1003.1标准定义了一个C语言多线程编程接口。依附于该标准的实现被称为POSIX theads 或 Pthreads。

该教程介绍了Pthreads的概念、动机和设计思想。内容包含了Pthreads API主要的三大类函数:线程管理(Thread Managment)、互斥量(Mutex Variables)和条件变量(Condition Variables)。向刚开始学习Pthreads的程序员提供了演示例程。

适于:刚开始学习使用线程实现并行程序设计;对于C并行程序设计有基本了解。不熟悉并行程序设计的可以参考EC3500: Introduction To Parallel Computing。


2. 译者序

三天时间,终于在工作期间,抽空把上一篇POSIX threads programing翻译完了。由于水平有限,翻译质量差强人意,若有不合理或错误之处,请您之处,在此深表感谢!有疑问点此查看原文。在参考部分提及的几本关于Pthreads库的大作及该文章原文和译文可在下面的连接下载:

  • 本篇及其英文原文: http://download.csdn.net/source/992256
  • 多线程编程指南: http://download.csdn.net/source/992248
  • Programing with POSIX thread(强烈推荐): http://download.csdn.net/source/992239
  • Pthread Primer(强烈推荐): http://download.csdn.net/source/992213

3. Pthreads概述

3.1 什么是线程?

技术上,线程可以定义为:可以被操作系统调度的独立的指令流。但是这是什么意思呢?

对于软件开发者,在主程序中运行的“函数过程”可以很好的描述线程的概念。

进一步,想象下主程序(a.out)包含了许多函数,操作系统可以调度这些函数,使之同时或者(和)独立的执行。这就描述了“多线程”程序。
怎样完成的呢?

在理解线程之前,应先对UNIX进程(process)有所了解。进程被操作系统创建,需要相当多的“额外开销”。进程包含了程序的资源和执行状态信息。如下:

  • 进程ID,进程group ID,用户ID和group ID
  • 环境
  • 工作目录
  • 程序指令
  • 寄存器
  • 栈
  • 堆
  • 文件描述符
  • 信号操作(Signal actions)
  • 共享库
  • 进程间通信工具(如:消息队列,管道,信号量或共享内存)

进程

线程使用并存在于进程资源中,还可以被操作系统调用并独立地运行,这主要是因为线程仅仅复制必要的资源以使自己得以存在并执行。

独立的控制流得以实现是因为线程维持着自己的:

  • 堆栈指针
  • 寄存器
  • 调度属性(如:策略或优先级)
  • 待定的和阻塞的信号集合(Set of pending and blocked signals)
  • 线程专用数据(TSD:Thread Specific Data.)

因此,在UNIX环境下线程:

  • 存在于进程,使用进程资源
  • 拥有自己独立的控制流,只要父进程存在并且操作系统支持
  • 只复制必可以使得独立调度的必要资源
  • 可以和其他线程独立(或非独立的)地共享进程资源
  • 当父进程结束时结束,或者相关类似的
  • 是“轻型的”,因为大部分额外开销已经在进程创建时完成了

因为在同一个进程中的线程共享资源:

  • 一个线程对系统资源(如关闭一个文件)的改变对所有其它线程是可以见的
  • 两个同样值的指针指向相同的数据
  • 读写同一个内存位置是可能的,因此需要成员显式地使用同步

3.2 什么是 Pthreads?

历史上,硬件销售商实现了私有版本的多线程库。这些实现在本质上各自不同,使得程序员难于开发可移植的应用程序。

为了使用线程所提供的强大优点,需要一个标准的程序接口。对于UNIX系统,IEEE POSIX 1003.1c(1995)标准制订了这一标准接口。依赖于该标准的实现就称为POSIX threads 或者Pthreads。现在多数硬件销售商也提供Pthreads,附加于私有的API。

Pthreads 被定义为一些C语言类型和函数调用,用pthread.h头(包含)文件和线程库实现。这个库可以是其它库的一部分,如libc。


3.3 为什么使用 Pthreads?

使用Pthreads的主要动机是提高潜在程序的性能。

当与创建和管理进程的花费相比,线程可以使用操作系统较少的开销,管理线程需要较少的系统资源。

例如,下表比较了fork()函数和pthread_create()函数所用的时间。计时反应了50,000个进程/线程的创建,使用时间工具实现,单位是秒,没有优化标志。

备注:不要期待系统和用户时间加起来就是真实时间,因为这些SMP系统有多个CPU同时工作。这些都是近似值。


平台 fork() pthread_create()
real user sys real user sys
AMD 2.4 GHz Opteron (8cpus/node) 41.07 60.08 9.01 0.66 0.19 0.43
IBM 1.9 GHz POWER5 p5-575 (8cpus/node) 64.24 30.78 27.68 1.75 0.69 1.10
IBM 1.5 GHz POWER4 (8cpus/node) 104.05 48.64 47.21 2.01 1.00 1.52
INTEL 2.4 GHz Xeon (2 cpus/node) 54.95 1.54 20.78 1.64 0.67 0.90
INTEL 1.4 GHz Itanium2 (4 cpus/node) 54.54 1.07 22.22 2.03 1.26 0.67

在同一个进程中的所有线程共享同样的地址空间。较于进程间的通信,在许多情况下线程间的通信效率比较高,且易于使用。

较于没有使用线程的程序,使用线程的应用程序有潜在的性能增益和实际的优点:

  • CPU使用I/O交叠工作:例如,一个程序可能有一个需要较长时间的I/O操作,当一个线程等待I/O系统调用完成时,CPU可以被其它线程使用。
  • 优先/实时调度:比较重要的任务可以被调度,替换或者中断较低优先级的任务。
  • 异步事件处理:频率和持续时间不确定的任务可以交错。例如,web服务器可以同时为前一个请求传输数据和管理新请求。

考虑在SMP架构上使用Pthreads的主要动机是获的最优的性能。特别的,如果一个程序使用MPI在节点通信,使用Pthreads可以使得节点数据传输得到显著提高。

例如:

  • MPI库经常用共享内存实现节点任务通信,这至少需要一次内存复制操作(进程到进程)。
  • Pthreads没有中间的内存复制,因为线程和一个进程共享同样的地址空间。没有数据传输。变成cache-to-CPU或memory-to-CPU的带宽(最坏情况),速度是相当的快。
  • 比较如下:


Platform MPI Shared Memory Bandwidth(GB/sec) Pthreads Worst Case Memory-to-CPU Bandwidth (GB/sec)
AMD 2.4 GHz Opteron 1.2 5.3
IBM 1.9 GHz POWER5 p5-575 4.1 16
IBM 1.5 GHz POWER4 2.1 4
Intel 1.4 GHz Xeon 0.3 4.3
Intel 1.4 GHz Itanium 2 1.8 6.4

3.4 使用线程设计程序

并行编程:

在现代多CPU机器上,pthread非常适于并行编程。可以用于并行程序设计的,也可以用于pthread程序设计。

并行程序要考虑许多,如下:

  • 用什么并行程序设计模型?
  • 问题划分
  • 加载平衡(Load balancing)
  • 通信
  • 数据依赖
  • 同步和竞争条件
  • 内存问题
  • I/O问题
  • 程序复杂度
  • 程序员的努力/花费/时间
  • …

包含这些主题超出本教程的范围,有兴趣的读者可以快速浏览下“Introduction to Parallel Computing”教程。

大体上,为了使用Pthreads的优点,必须将任务组织程离散的,独立的,可以并发执行的。例如,如果routine1和routine2可以互换,相互交叉和(或者)重叠,他们就可以线程化。

拥有下述特性的程序可以使用pthreads:

  • 工作可以被多个任务同时执行,或者数据可以同时被多个任务操作。
  • 阻塞与潜在的长时间I/O等待。
  • 在某些地方使用很多CPU循环而其他地方没有。
  • 对异步事件必须响应。
  • 一些工作比其他的重要(优先级中断)。

Pthreads 也可以用于串行程序,模拟并行执行。很好例子就是经典的web浏览器,对于多数人,运行于单CPU的桌面/膝上机器,许多东西可以同时“显示”出来。

使用线程编程的几种常见模型:

  • 管理者/工作者(Manager/worker):一个单线程,作为管理器将工作分配给其它线程(工作者),典型的,管理器处理所有输入和分配工作给其它任务。至少两种形式的manager/worker模型比较常用:静态worker池和动态worker池。

  • 管道(Pipeline):任务可以被划分为一系列子操作,每一个被串行处理,但是不同的线程并发处理。汽车装配线可以很好的描述这个模型。

  • Peer: 和manager/worker模型相似,但是主线程在创建了其它线程后,自己也参与工作。

共享内存模型(Shared Memory Model):

所有线程可以访问全局,共享内存

线程也有自己私有的数据

程序员负责对全局共享数据的同步存取(保护)

线程安全(Thread-safeness):

线程安全:简短的说,指程序可以同时执行多个线程却不会“破坏“共享数据或者产生“竞争”条件的能力。

例如:假设你的程序创建了几个线程,每一个调用相同的库函数:

  • 这个库函数存取/修改了一个全局结构或内存中的位置。
  • 当每个线程调用这个函数时,可能同时去修改这个全局结构活内存位置。
  • 如果函数没有使用同步机制去阻止数据破坏,这时,就不是线程安全的了。

如果你不是100%确定外部库函数是线程安全的,自己负责所可能引发的问题。

建议:小心使用库或者对象,当不能明确确定是否是线程安全的。若有疑虑,假设其不是线程安全的直到得以证明。可以通过不断地使用不确定的函数找出问题所在。


4. 编译多线程程序

下表列出了一些编译使用了pthreads库程序的命令:


Compiler/Platform Compiler Command Description
IBM AIX xlc_r / cc_r C (ANSI / non-ANSI)
xlC_r C++
xlf_r -qnosave, xlf90_r -qnosave Fortran - using IBM’s Pthreads API (non-portable)
INTEL Linux icc -pthread C
icpc -pthread C++
PathScale Linux pathcc -pthread C
pathCC -pthread C++
PGI Linux pgcc -lpthread C
pgCC -lpthread C++
GNU Linux, AIX gcc -pthread C
g++ -pthread C++

5. 线程管理(Thread Management)

5.1 创建和结束线程

函数:

pthread_create (thread,attr,start_routine,arg)  
pthread_exit (status)  
pthread_attr_init (attr)  
pthread_attr_destroy (attr)  

创建线程:

最初,main函数包含了一个缺省的线程。其它线程则需要程序员显式地创建。

pthread_create 创建一个新线程并使之运行起来。该函数可以在程序的任何地方调用。

pthread_create参数:

thread:返回一个不透明的,唯一的新线程标识符。 
attr:不透明的线程属性对象。可以指定一个线程属性对象,或者NULL为缺省值。 
start_routine:线程将会执行一次的C函数。 
arg: 传递给start_routine单个参数,传递时必须转换成指向void的指针类型。没有参数传递时,可设置为NULL。 

一个进程可以创建的线程最大数量取决于系统实现。

一旦创建,线程就称为peers,可以创建其它线程。线程之间没有指定的结构和依赖关系。

Q:一个线程被创建后,怎么知道操作系统何时调度该线程使之运行?

A:除非使用了Pthreads的调度机制,否则线程何时何地被执行取决于操作系统的实现。强壮的程序应该不依赖于线程执行的顺序。

线程属性:

线程被创建时会带有默认的属性。其中的一些属性可以被程序员用线程属性对象来修改。

pthread_attr_init 和 pthread_attr_destroy用于初始化/销毁先成属性对象。

其它的一些函数用于查询和设置线程属性对象的指定属性。

一些属性下面将会讨论。

结束终止:

结束线程的方法有一下几种:

  • 线程从主线程(main函数的初始线程)返回。
  • 线程调用了pthread_exit函数。
  • 其它线程使用 pthread_cancel函数结束线程。
  • 调用exec或者exit函数,整个进程结束。

pthread_exit用于显式退出线程。典型地,pthread_exit()函数在线程完成工作时,不在需要时候被调用,退出线程。

如果main()在其他线程创建前用pthread_exit()退出了,其他线程将会继续执行。否则,他们会随着main的结束而终止。

程序员可以可选择的指定终止状态,当任何线程连接(join)该线程时,该状态就返回给连接(join)该线程的线程。

清理:pthread_exit()函数并不会关闭文件,任何在线程中打开的文件将会一直处于打开状态,知道线程结束。

讨论:对于正常退出,可以免于调用pthread_exit()。当然,除非你想返回一个返回值。然而,在main中,有一个问题,就是当main结束时,其它线程还没有被创建。如果此时没有显式的调用pthread_exit(),当main结束时,进程(和所有线程)都会终止。可以在main中调用pthread_exit(),此时尽管在main中已经没有可执行的代码了,进程和所有线程将保持存活状态,。

例子: Pthread 创建和终止

该例用pthread_create()创建了5个线程。每一个线程都会打印一条“Hello World”的消息,然后调用pthread_exit()终止线程。

1
2
3
4
5
6
7
8
9
10
11
12
13
14
15
16
17
18
19
20
21
22
23
24
25
26
27

#include <pthread.h>
#include <stdio.h>
#define NUM_THREADS 5

void *PrintHello(void *threadid)
{
int tid;
tid = (int)threadid;
printf("Hello World! It's me, thread #%d!/n", tid);
pthread_exit(NULL);
}

int main (int argc, char *argv[])
{
pthread_t threads[NUM_THREADS];
int rc, t;
for(t=0; t<NUM_THREADS; t++){
printf("In main: creating thread %d/n", t);
rc = pthread_create(&threads[t], NULL, PrintHello, (void *)t);
if (rc){
printf("ERROR; return code from pthread_create() is %d/n", rc);
exit(-1);
}
}
pthread_exit(NULL);
}

5.2 向线程传递参数

pthread_create()函数允许程序员想线程的start routine传递一个参数。当多个参数需要被传递时,可以通过定义一个结构体包含所有要传的参数,然后用pthread_create()传递一个指向改结构体的指针,来打破传递参数的个数的限制。
所有参数都应该传引用传递并转化成(void*)。

Q:怎样安全地向一个新创建的线程传递数据? 
A:确保所传递的数据是线程安全的(不能被其他线程修改)。下面三个例子演示了那个应该和那个不应该。 

Example 1 - Thread Argument Passing

下面的代码片段演示了如何向一个线程传递一个简单的整数。主线程为每一个线程使用一个唯一的数据结构,确保每个线程传递的参数是完整的。

1
2
3
4
5
6
7
8
9
10
11
12

int *taskids[NUM_THREADS];

for(t=0; t<NUM_THREADS; t++)
{
taskids[t] = (int *) malloc(sizeof(int));
*taskids[t] = t;
printf("Creating thread %d/n", t);
rc = pthread_create(&threads[t], NULL, PrintHello,
(void *) taskids[t]);
...
}

Example 2 - Thread Argument Passing

例子展示了用结构体向线程设置/传递参数。每个线程获得一个唯一的结构体实例。

1
2
3
4
5
6
7
8
9
10
11
12
13
14
15
16
17
18
19
20
21
22
23
24
25
26
27
28
29
30

struct thread_data{
int thread_id;
int sum;
char *message;
};

struct thread_data thread_data_array[NUM_THREADS];

void *PrintHello(void *threadarg)
{
struct thread_data *my_data;
...
my_data = (struct thread_data *) threadarg;
taskid = my_data->thread_id;
sum = my_data->sum;
hello_msg = my_data->message;
...
}

int main (int argc, char *argv[])
{
...
thread_data_array[t].thread_id = t;
thread_data_array[t].sum = sum;
thread_data_array[t].message = messages[t];
rc = pthread_create(&threads[t], NULL, PrintHello,
(void *) &thread_data_array[t]);
...
}

Example 3 - Thread Argument Passing (Incorrect)

例子演示了错误地传递参数。循环会在线程访问传递的参数前改变传递给线程的地址的内容。

1
2
3
4
5
6
7
8
9
int rc, t; 

for(t=0; t<NUM_THREADS; t++)
{
printf("Creating thread %d/n", t);
rc = pthread_create(&threads[t], NULL, PrintHello,
(void *) &t);
...
}

5.3 连接(Joining)和分离(Detaching)线程

函数:

pthread_detach (threadid,status)  
pthread_attr_setdetachstate (attr,detachstate)  
pthread_attr_getdetachstate (attr,detachstate)  
pthread_join (threadid,status)  

连接:

“连接”是一种在线程间完成同步的方法。例如:

pthread_join()函数阻赛调用线程知道threadid所指定的线程终止。

如果在目标线程中调用pthread_exit(),程序员可以在主线程中获得目标线程的终止状态。

连接线程只能用pthread_join()连接一次。若多次调用就会发生逻辑错误。

两种同步方法,互斥量(mutexes)和条件变量(condition variables),稍后讨论。

可连接(Joinable or Not)?

当一个线程被创建,它有一个属性定义了它是可连接的(joinable)还是分离的(detached)。只有是可连接的线程才能被连接(joined),若果创建的线程是分离的,则不能连接。

POSIX标准的最终草案指定了线程必须创建成可连接的。然而,并非所有实现都遵循此约定。

使用pthread_create()的attr参数可以显式的创建可连接或分离的线程,典型四步如下:

  • 声明一个pthread_attr_t数据类型的线程属性变量
  • 用pthread_attr_init()初始化改属性变量
  • 用pthread_attr_setdetachstate()设置可分离状态属性
  • 完了后,用pthread_attr_destroy()释放属性所占用的库资源

分离(Detaching):

pthread_detach()可以显式用于分离线程,尽管创建时是可连接的。
没
有与pthread_detach()功能相反的函数

建议:

  • 若线程需要连接,考虑创建时显式设置为可连接的。因为并非所有创建线程的实现都是将线程创建为可连接的。
  • 若事先知道线程从不需要连接,考虑创建线程时将其设置为可分离状态。一些系统资源可能需要释放。

例子: Pthread Joining

Example Code - Pthread Joining

这个例子演示了用Pthread join函数去等待线程终止。因为有些实现并不是默认创建线程是可连接状态,例子中显式地将其创建为可连接的。

1
2
3
4
5
6
7
8
9
10
11
12
13
14
15
16
17
18
19
20
21
22
23
24
25
26
27
28
29
30
31
32
33
34
35
36
37
38
39
40
41
42
43
44
45
46
47
48
49
50
51
52
53
54
55
56

#include <pthread.h>
#include <stdio.h>
#define NUM_THREADS 3

void *BusyWork(void *null)
{
int i;
double result=0.0;
for (i=0; i<1000000; i++)
{
result = result + (double)random();
}
printf("result = %e/n",result);
pthread_exit((void *) 0);
}

int main (int argc, char *argv[])
{
pthread_t thread[NUM_THREADS];
pthread_attr_t attr;
int rc, t;
void *status;

/* Initialize and set thread detached attribute */
pthread_attr_init(&attr);
pthread_attr_setdetachstate(&attr, PTHREAD_CREATE_JOINABLE);

for(t=0; t<NUM_THREADS; t++)
{
printf("Creating thread %d/n", t);
rc = pthread_create(&thread[t], &attr, BusyWork, NULL);
if (rc)
{
printf("ERROR; return code from pthread_create()
is %d/n", rc);
exit(-1);
}
}

/* Free attribute and wait for the other threads */
pthread_attr_destroy(&attr);
for(t=0; t<NUM_THREADS; t++)
{
rc = pthread_join(thread[t], &status);
if (rc)
{
printf("ERROR; return code from pthread_join()
is %d/n", rc);
exit(-1);
}
printf("Completed join with thread %d status= %ld/n",t, (long)status);
}

pthread_exit(NULL);
}

5.4 栈管理

函数:

pthread_attr_getstacksize (attr, stacksize)  
pthread_attr_setstacksize (attr, stacksize)  
pthread_attr_getstackaddr (attr, stackaddr)  
pthread_attr_setstackaddr (attr, stackaddr)  

防止栈问题:

POSIX标准并没有指定线程栈的大小,依赖于实现并随实现变化。

很容易超出默认的栈大小,常见结果:程序终止或者数据损坏。

安全和可移植的程序应该不依赖于默认的栈限制,但是取而代之的是用pthread_attr_setstacksize分配足够的栈大小。

pthread_attr_getstackaddr和pthread_attr_setstackaddr函数可以被程序用于将栈设置在指定的内存区域。

在LC上的一些实际例子:

默认栈大小经常变化很大,最大值也变化很大,可能会依赖于每个节点的线程数目。


Node Architecture #CPUS Memory(GB) Default Size (bytes)
AMD Opteron 8 16 2,097,152
Intel IA64 4 8 33,554,432
Intel IA32 2 4 2,097,152
IBM Power5 8 32 196,608
IBM Power4 8 16 196,608
IBM Power3 16 32 98,304

例子: 栈管理

Example Code - Stack Management

这个例子演示了如何去查询和设定线程栈大小。

1
2
3
4
5
6
7
8
9
10
11
12
13
14
15
16
17
18
19
20
21
22
23
24
25
26
27
28
29
30
31
32
33
34
35
36
37
38
39
40
41
42
43
44
45
46
47

#include <pthread.h>
#include <stdio.h>
#define NTHREADS 4
#define N 1000
#define MEGEXTRA 1000000

pthread_attr_t attr;

void *dowork(void *threadid)
{
double A[N][N];
int i,j,tid;
size_t mystacksize;

tid = (int)threadid;
pthread_attr_getstacksize (&attr, &mystacksize);
printf("Thread %d: stack size = %li bytes /n", tid, mystacksize);
for (i=0; i<N; i++)
for (j=0; j<N; j++)
A[i][j] = ((i*j)/3.452) + (N-i);
pthread_exit(NULL);
}

int main(int argc, char *argv[])
{
pthread_t threads[NTHREADS];
size_t stacksize;
int rc, t;

pthread_attr_init(&attr);
pthread_attr_getstacksize (&attr, &stacksize);
printf("Default stack size = %li/n", stacksize);
stacksize = sizeof(double)*N*N+MEGEXTRA;
printf("Amount of stack needed per thread = %li/n",stacksize);
pthread_attr_setstacksize (&attr, stacksize);
printf("Creating threads with stack size = %li bytes/n",stacksize);
for(t=0; t<NTHREADS; t++){
rc = pthread_create(&threads[t], &attr, dowork, (void *)t);
if (rc){
printf("ERROR; return code from pthread_create() is %d/n", rc);
exit(-1);
}
}
printf("Created %d threads./n", t);
pthread_exit(NULL);
}

5.5 其他各种函数

pthread_self ()  
pthread_equal (thread1,thread2)  

pthread_self返回调用该函数的线程的唯一,系统分配的线程ID。

pthread_equal比较两个线程ID,若不同返回0,否则返回非0值。

注意这两个函数中的线程ID对象是不透明的,不是轻易能检查的。因为线程ID是不透明的对象,所以C语言的==操作符不能用于比较两个线程ID。

pthread_once (once_control, init_routine)  

pthread_once 在一个进程中仅执行一次init_routine。任何线程第一次调用该函数会执行给定的init_routine,不带参数,任何后续调用都没有效果。

init_routine函数一般是初始化的程序

once_control参数是一个同步结构体,需要在调用pthread_once前初始化。例如:

pthread_once_t once_control = PTHREAD_ONCE_INIT;  

6. 互斥量(Mutex Variables)

6.1 概述

互斥量(Mutex)是“mutual exclusion”的缩写。互斥量是实现线程同步,和保护同时写共享数据的主要方法

互斥量对共享数据的保护就像一把锁。在Pthreads中,任何时候仅有一个线程可以锁定互斥量,因此,当多个线程尝试去锁定该互斥量时仅有一个会成功。直到锁定互斥量的线程解锁互斥量后,其他线程才可以去锁定互斥量。线程必须轮着访问受保护数据。

互斥量可以防止“竞争”条件。下面的例子是一个银行事务处理时发生了竞争条件:


Thread 1 Thread 2 Balance
Read balance: $1000 $1000
Deposit $200 $1000
Deposit $200 $1000
Update balance $1000+$200 $1200

上面的例子,当一个线程使用共享数据资源时,应该用一个互斥量去锁定“Balance”。

一个拥有互斥量的线程经常用于更新全局变量。确保了多个线程更新同样的变量以安全的方式运行,最终的结果和一个线程处理的结果是相同的。这个更新的变量属于一个“临界区(critical section)”。

使用互斥量的典型顺序如下:

  • 创建和初始一个互斥量
  • 多个线程尝试去锁定该互斥量
  • 仅有一个线程可以成功锁定改互斥量
  • 锁定成功的线程做一些处理
  • 线程解锁该互斥量
  • 另外一个线程获得互斥量,重复上述过程
  • 最后销毁互斥量

当多个线程竞争同一个互斥量时,失败的线程会阻塞在lock调用处。可以用“trylock”替换“lock”,则失败时不会阻塞。

当保护共享数据时,程序员有责任去确认是否需要使用互斥量。如,若四个线程会更新同样的数据,但仅有一个线程用了互斥量,则数据可能会损坏。


6.2 创建和销毁互斥量

函数:

pthread_mutex_init (mutex,attr)  
pthread_mutex_destroy (mutex)  
pthread_mutexattr_init (attr)  
pthread_mutexattr_destroy (attr)  

用法:

互斥量必须用类型pthread_mutex_t类型声明,在使用前必须初始化,这里有两种方法可以初始化互斥量:

声明时静态地,如:
pthread_mutex_t mymutex = PTHREAD_MUTEX_INITIALIZER;

动态地用pthread_mutex_init()函数,这种方法允许设定互斥量的属性对象attr。

互斥量初始化后是解锁的。

attr对象用于设置互斥量对象的属性,使用时必须声明为pthread_mutextattr_t类型,默认值可以是NULL。Pthreads标准定义了三种可选的互斥量属性:

  • 协议(Protocol): 指定了协议用于阻止互斥量的优先级改变
  • 优先级上限(Prioceiling):指定互斥量的优先级上限
  • 进程共享(Process-shared):指定进程共享互斥量

注意所有实现都提供了这三个可先的互斥量属性。

pthread_mutexattr_init()和pthread_mutexattr_destroy()函数分别用于创建和销毁互斥量属性对象。

pthread_mutex_destroy()应该用于释放不需要再使用的互斥量对象。


6.3 锁定和解锁互斥量

函数:

pthread_mutex_lock (mutex)  
pthread_mutex_trylock (mutex)  
pthread_mutex_unlock (mutex)  

用法:

线程用pthread_mutex_lock()函数去锁定指定的mutex变量,若该mutex已经被另外一个线程锁定了,该调用将会阻塞线程直到mutex被解锁。

pthread_mutex_trylock() will attempt to lock a mutex. However, if the mutex is already locked, the routine will return immediately with a “busy” error code. This routine may be useful in

pthread_mutex_trylock()

尝试着去锁定一个互斥量,然而,若互斥量已被锁定,程序会立刻返回并返回一个忙错误值。该函数在优先级改变情况下阻止死锁是非常有用的。

线程可以用pthread_mutex_unlock()解锁自己占用的互斥量。在一个线程完成对保护数据的使用,而其它线程要获得互斥量在保护数据上工作时,可以调用该函数。若有一下情形则会发生错误:

  • 互斥量已经被解锁
  • 互斥量被另一个线程占用

互斥量并没有多么“神奇”的,实际上,它们就是参与的线程的“君子约定”。写代码时要确信正确地锁定,解锁互斥量。下面演示了一种逻辑错误:

·                    Thread 1     Thread 2     Thread 3 
·                    Lock         Lock          
·                    A = 2        A = A+1      A = A*B 
·                    Unlock       Unlock     

Q:有多个线程等待同一个锁定的互斥量,当互斥量被解锁后,那个线程会第一个锁定互斥量?

A:除非线程使用了优先级调度机制,否则,线程会被系统调度器去分配,那个线程会第一个锁定互斥量是随机的。

例子:使用互斥量

Example Code - Using Mutexes

例程演示了线程使用互斥量处理一个点积(dot product)计算。主数据通过一个可全局访问的数据结构被所有线程使用,每个线程处理数据的不同部分,主线程等待其他线程完成计算并输出结果。

1
2
3
4
5
6
7
8
9
10
11
12
13
14
15
16
17
18
19
20
21
22
23
24
25
26
27
28
29
30
31
32
33
34
35
36
37
38
39
40
41
42
43
44
45
46
47
48
49
50
51
52
53
54
55
56
57
58
59
60
61
62
63
64
65
66
67
68
69
70
71
72
73
74
75
76
77
78
79
80
81
82
83
84
85
86
87
88
89
90
91
92
93
94
95
96
97
98
99
100
101
102
103
104
105
106
107
108
109
110
111
112
113
114
115
116
117
118
119
120
121
122
123
124
125
126
127
128
129
130
131
132
133
134
135
136
137
138
139

#include <pthread.h>
#include <stdio.h>
#include <malloc.h>

/*
The following structure contains the necessary information
to allow the function "dotprod" to access its input data and
place its output into the structure.
*/

typedef struct
{
double *a;
double *b;
double sum;
int veclen;
} DOTDATA;

/* Define globally accessible variables and a mutex */

#define NUMTHRDS 4
#define VECLEN 100
DOTDATA dotstr;
pthread_t callThd[NUMTHRDS];
pthread_mutex_t mutexsum;

/*
The function dotprod is activated when the thread is created.
All input to this routine is obtained from a structure
of type DOTDATA and all output from this function is written into
this structure. The benefit of this approach is apparent for the
multi-threaded program: when a thread is created we pass a single
argument to the activated function - typically this argument
is a thread number. All the other information required by the
function is accessed from the globally accessible structure.
*/

void *dotprod(void *arg)
{

/* Define and use local variables for convenience */

int i, start, end, offset, len ;
double mysum, *x, *y;
offset = (int)arg;

len = dotstr.veclen;
start = offset*len;
end = start + len;
x = dotstr.a;
y = dotstr.b;

/*
Perform the dot product and assign result
to the appropriate variable in the structure.
*/

mysum = 0;
for (i=start; i<end ; i++)
{
mysum += (x[i] * y[i]);
}

/*
Lock a mutex prior to updating the value in the shared
structure, and unlock it upon updating.
*/
pthread_mutex_lock (&mutexsum);
dotstr.sum += mysum;
pthread_mutex_unlock (&mutexsum);

pthread_exit((void*) 0);
}

/*
The main program creates threads which do all the work and then
print out result upon completion. Before creating the threads,
the input data is created. Since all threads update a shared structure,
we need a mutex for mutual exclusion. The main thread needs to wait for
all threads to complete, it waits for each one of the threads. We specify
a thread attribute value that allow the main thread to join with the
threads it creates. Note also that we free up handles when they are
no longer needed.
*/

int main (int argc, char *argv[])
{
int i;
double *a, *b;
void *status;
pthread_attr_t attr;

/* Assign storage and initialize values */
a = (double*) malloc (NUMTHRDS*VECLEN*sizeof(double));
b = (double*) malloc (NUMTHRDS*VECLEN*sizeof(double));

for (i=0; i<VECLEN*NUMTHRDS; i++)
{
a[i]=1.0;
b[i]=a[i];
}

dotstr.veclen = VECLEN;
dotstr.a = a;
dotstr.b = b;
dotstr.sum=0;

pthread_mutex_init(&mutexsum, NULL);

/* Create threads to perform the dotproduct */
pthread_attr_init(&attr);
pthread_attr_setdetachstate(&attr, PTHREAD_CREATE_JOINABLE);

for(i=0; i<NUMTHRDS; i++)
{
/*
Each thread works on a different set of data.
The offset is specified by 'i'. The size of
the data for each thread is indicated by VECLEN.
*/
pthread_create( &callThd[i], &attr, dotprod, (void *)i);
}

pthread_attr_destroy(&attr);

/* Wait on the other threads */
for(i=0; i<NUMTHRDS; i++)
{
pthread_join( callThd[i], &status);
}

/* After joining, print out the results and cleanup */
printf ("Sum = %f /n", dotstr.sum);
free (a);
free (b);
pthread_mutex_destroy(&mutexsum);
pthread_exit(NULL);
}

7. 条件变量(Condition Variables)

7.1 概述

条件变量提供了另一种同步的方式。互斥量通过控制对数据的访问实现了同步,而条件变量允许根据实际的数据值来实现同步。

没有条件变量,程序员就必须使用线程去轮询(可能在临界区),查看条件是否满足。这样比较消耗资源,因为线程连续繁忙工作。条件变量是一种可以实现这种轮询的方式。

条件变量往往和互斥一起使用

使用条件变量的代表性顺序如下:

主线程(Main Thread)  
o                                声明和初始化需要同步的全局数据/变量(如“count”) 
o                                生命和初始化一个条件变量对象 
o                                声明和初始化一个相关的互斥量 
o                                创建工作线程A和B 

Thread A  
o                                工作,一直到一定的条件满足(如“count”等于一个指定的值) 
o                                锁定相关互斥量并检查全局变量的值 
o                                调用pthread_cond_wait()阻塞等待Thread-B的信号。注意pthread_cond_wait()能够自动地并且原子地解锁相关的互斥量,以至于它可以被Thread-B使用。 
o                                当收到信号,唤醒线程,互斥量被自动,原子地锁定。 
o                                显式解锁互斥量 
o                                继续 
Thread B  
o                                工作 
o                                锁定相关互斥量 
o                                改变Thread-A所等待的全局变量 
o                                检查全局变量的值,若达到需要的条件,像Thread-A发信号。 
o                                解锁互斥量 
o                                继续 

Main Thread  
Join / Continue  

7.2 创建和销毁条件变量

Routines:

pthread_cond_init (condition,attr)  
pthread_cond_destroy (condition)  
pthread_condattr_init (attr)  
pthread_condattr_destroy (attr)  

Usage:

条件变量必须声明为pthread_cond_t类型,必须在使用前初始化。有两种方式可以初始条件变量:

声明时静态地。如:

pthread_cond_t myconvar = PTHREAD_COND_INITIALIZER;  

用pthread_cond_init()函数动态地。创建的条件变量ID通过condition参数返回给调用线程。该方式允许设置条件变量对象的属性,attr。

可选的attr对象用于设定条件变量的属性。仅有一个属性被定义:线程共享(process-shared),可以使条件变量被其它进程中的线程看到。若要使用属性对象,必须定义为pthread_condattr_t类型(可以指定为NULL设为默认)。

注意所有实现都提供了线程共享属性。

pthread_condattr_init()和pthread_condattr_destroy()用于创建和销毁条件变量属性对象。

条件变量不需要再使用时,应用pthread_cond_destroy()释放条件变量。


7.3 在条件变量上等待(Waiting)和发送信号(Signaling)

函数:

pthread_cond_wait (condition,mutex)  
pthread_cond_signal (condition)  
pthread_cond_broadcast (condition)  

用法:

pthread_cond_wait()阻塞调用线程直到指定的条件受信(signaled)。该函数应该在互斥量锁定时调用,当在等待时会自动解锁互斥量。在信号被发送,线程被激活后,互斥量会自动被锁定,当线程结束时,由程序员负责解锁互斥量。

pthread_cond_signal()函数用于向其他等待在条件变量上的线程发送信号(激活其它线程)。应该在互斥量被锁定后调用。

若不止一个线程阻塞在条件变量上,则应用pthread_cond_broadcast()向其它所以线程发生信号。

在调用pthread_cond_wait()前调用pthread_cond_signal()会发生逻辑错误。

使用这些函数时适当的锁定和解锁相关的互斥量是非常重要的。如:

  • 调用pthread_cond_wait()前锁定互斥量失败可能导致线程不会阻塞。
  • 调用pthread_cond_signal()后解锁互斥量失败可能会不允许相应的pthread_cond_wait()函数结束(保存阻塞)。

例子:使用条件变量

Example Code - Using Condition Variables

例子演示了使用Pthreads条件变量的几个函数。主程序创建了三个线程,两个线程工作,根系“count”变量。第三个线程等待count变量值达到指定的值。

1
2
3
4
5
6
7
8
9
10
11
12
13
14
15
16
17
18
19
20
21
22
23
24
25
26
27
28
29
30
31
32
33
34
35
36
37
38
39
40
41
42
43
44
45
46
47
48
49
50
51
52
53
54
55
56
57
58
59
60
61
62
63
64
65
66
67
68
69
70
71
72
73
74
75
76
77
78
79
80
81
82
83
84
85
86
87
88
89
90
91
92
93
94
95
96

#include <pthread.h>
#include <stdio.h>

#define NUM_THREADS 3
#define TCOUNT 10
#define COUNT_LIMIT 12

int count = 0;
int thread_ids[3] = {0,1,2};
pthread_mutex_t count_mutex;
pthread_cond_t count_threshold_cv;

void *inc_count(void *idp)
{
int j,i;
double result=0.0;
int *my_id = idp;

for (i=0; i<TCOUNT; i++) {
pthread_mutex_lock(&count_mutex);
count++;

/*
Check the value of count and signal waiting thread when condition is
reached. Note that this occurs while mutex is locked.
*/
if (count == COUNT_LIMIT) {
pthread_cond_signal(&count_threshold_cv);
printf("inc_count(): thread %d, count = %d Threshold reached./n",
*my_id, count);
}
printf("inc_count(): thread %d, count = %d, unlocking mutex/n",
*my_id, count);
pthread_mutex_unlock(&count_mutex);

/* Do some work so threads can alternate on mutex lock */
for (j=0; j<1000; j++)
result = result + (double)random();
}
pthread_exit(NULL);
}

void *watch_count(void *idp)
{
int *my_id = idp;

printf("Starting watch_count(): thread %d/n", *my_id);

/*
Lock mutex and wait for signal. Note that the pthread_cond_wait
routine will automatically and atomically unlock mutex while it waits.
Also, note that if COUNT_LIMIT is reached before this routine is run by
the waiting thread, the loop will be skipped to prevent pthread_cond_wait
from never returning.
*/
pthread_mutex_lock(&count_mutex);
if (count<COUNT_LIMIT) {
pthread_cond_wait(&count_threshold_cv, &count_mutex);
printf("watch_count(): thread %d Condition signal
received./n", *my_id);
}
pthread_mutex_unlock(&count_mutex);
pthread_exit(NULL);
}

int main (int argc, char *argv[])
{
int i, rc;
pthread_t threads[3];
pthread_attr_t attr;

/* Initialize mutex and condition variable objects */
pthread_mutex_init(&count_mutex, NULL);
pthread_cond_init (&count_threshold_cv, NULL);

/* For portability, explicitly create threads in a joinable state */
pthread_attr_init(&attr);
pthread_attr_setdetachstate(&attr, PTHREAD_CREATE_JOINABLE);
pthread_create(&threads[0], &attr, inc_count, (void *)&thread_ids[0]);
pthread_create(&threads[1], &attr, inc_count, (void *)&thread_ids[1]);
pthread_create(&threads[2], &attr, watch_count, (void *)&thread_ids[2]);

/* Wait for all threads to complete */
for (i=0; i<NUM_THREADS; i++) {
pthread_join(threads[i], NULL);
}
printf ("Main(): Waited on %d threads. Done./n", NUM_THREADS);

/* Clean up and exit */
pthread_attr_destroy(&attr);
pthread_mutex_destroy(&count_mutex);
pthread_cond_destroy(&count_threshold_cv);
pthread_exit(NULL);

}

8. 没有覆盖的主题

Pthread API的几个特性在该教程中并没有包含。把它们列在下面:

  • 线程调度
    线程如何调度的实现往往是不同的,在大多数情况下,默认的机制是可以胜任的。 Pthreads API提供了显式设定线程调度策略和优先级的函数,它们可以重载默认机制。
  • API不需要实现去支持这些特性
  • Keys:线程数据(TSD)
  • 互斥量的Protocol属性和优先级管理
  • 跨进程的条件变量共享
  • 取消线程(Thread Cancellation )
  • 多线程和信号(Threads and Signals)

9. Pthread 库API参考

Pthread Functions:

  • Thread Management

    pthread_create
    pthread_exit
    pthread_join
    pthread_once
    pthread_kill
    pthread_self
    pthread_equal
    pthread_yield
    pthread_detach

  • Thread-Specific Data

    pthread_key_create
    pthread_key_delete
    pthread_getspecific
    pthread_setspecific

  • Thread Cancellation
    pthread_cancel pthread_cleanup_pop
    pthread_cleanup_push pthread_setcancelstate
    pthread_getcancelstate pthread_testcancel

  • Thread Scheduling
    pthread_getschedparam pthread_setschedparam

  • Signals
    ** pthread_sigmask

Pthread Attribute Functions:

  • Basic Management
    pthread_attr_init pthread_attr_destroy

  • Detachable or Joinable
    pthread_attr_setdetachstate pthread_attr_getdetachstate

  • Specifying Stack Information
    pthread_attr_getstackaddr pthread_attr_getstacksize
    pthread_attr_setstackaddr pthread_attr_setstacksize

  • Thread Scheduling Attributes
    pthread_attr_getschedparam pthread_attr_setschedparam
    pthread_attr_getschedpolicy pthread_attr_setschedpolicy
    pthread_attr_setinheritsched pthread_attr_getinheritsched
    pthread_attr_setscope pthread_attr_getscope

Mutex Functions:

  • Mutex Management
    pthread_mutex_init pthread_mutex_destroy
    pthread_mutex_lock pthread_mutex_unlock
    ** pthread_mutex_trylock

  • Priority Management
    pthread_mutex_setprioceiling pthread_mutex_getprioceiling

Mutex Attribute Functions:

  • Basic Management
    pthread_mutexattr_init pthread_mutexattr_destroy

  • Sharing
    pthread_mutexattr_getpshared pthread_mutexattr_setpshared

  • Protocol Attributes
    pthread_mutexattr_getprotocol pthread_mutexattr_setprotocol

  • Priority Management
    pthread_mutexattr_setprioceiling pthread_mutexattr_getprioceiling

Condition Variable Functions:

  • Basic Management
    pthread_cond_init pthread_cond_destroy
    pthread_cond_signal pthread_cond_broadcast
    pthread_cond_wait pthread_cond_timedwait

Condition Variable Attribute Functions:

  • Basic Management

    pthread_condattr_init
    pthread_condattr_destroy

  • Sharing

    pthread_condattr_getpshared
    pthread_condattr_setpshared


参考资料

  • Author: Blaise Barney, Livermore Computing.
  • “Pthreads Programming”. B. Nichols et al. O’Reilly and Associates.
  • “Threads Primer”. B. Lewis and D. Berg. Prentice Hall
  • “Programming With POSIX Threads”. D. Butenhof. Addison Wesley
  • www.awl.com/cseng/titles/0-201-63392-2
  • “Programming With Threads”. S. Kleiman et al. Prentice Hall

(完)

内核模块相关命令:lsmod,depmod,modprob...

发表于 2009-02-04   |   分类于 Linux

lsmod

功能:列出内核已载入模块的状态

用法:lsmod

描述:

lsmod 以美观的方式列出/proc/modules的内容。输出为:

Module(模块名)    Size(模块大小)   Used by(被...使用)

eg. ne2k_pci           8928               0
8390                 9472              1 ne2k_pci

在/proc/modules中相应的是:

(模块名,模块大小,被...使用,模块地址(猜的,以后确认)) 
ne2k_pci 8928 0 - Live 0x3086400
8390 9472 1 ne2k_pci , Live 0xe086000

depmod

功能:分析可加载模块的依赖性,生成modules.dep文件和映射文件。

用法:
depmod [-b basedir] [-e] [-F System.map] [-n] [-v] [version] [-A]
depmod [-e] [-F System.map] [-n] [-v] [version] [filename…]

描述:

Linux内核模块可以为其它模块提供提供服务(在代码中使用EXPORT_SYMBOL),这种服务被称作”symbols”。若第二个模块使用了这个symbol,则该模块很明显依赖于第一个模块。这些依赖关系是非常繁杂的。

depmod读取在/lib/modules/version 目录下的所有模块,并检查每个模块导出的symbol和需要的symbol,然后创建一个依赖关系列表。默认地,该列表写入到/lib/moudules/version目录下的modules.dep文件中。若命令中的filename有指定的话,则仅检查这些指定的模块(不是很有用)。

若命令中提供了version参数,则会使用version所指定的目录生成依赖,而不是当前内核的版本(uname -r 返回的)。

选项:

-b basedir  --basedir basedir  若你的模块并没有正确的在/lib/mdules/version下,可以指定目录生成依赖。
-e  --errsyms  和-F选项一起使用,当一个模块需要的symbol在其它模块里面没有提供时,做出报告。正常情况下,模块没有提供的symbol都在内核中有提供。
-F  --filesyms System.map 提供一个System.map文件(在内核编译时生成的)许-e选项报告出unresolved symbol。
-n  --dry_run  将结果modules.dep和各种映射文件输出到标准输出(stdout),而不是写到模块目录下。
-A --quick  检查是否有模块比modues.dep中的模块新,若没有,则退出不重新生成文件。

modprobe

功能:Linux内核添加删除模块

用法:

modprobe [ -v ] [ -V ] [-C config-file] [ -n ] [ -i ] [ -q ] [ -o modulename] [ modulename ] [ module parameters ... ]
modprobe [ -r ] [ -v ] [ -n ] [ -i ] [ modulename ... ]
modprobe [ -l ] [ -t dirname ] [ wildcard ]
modprobe [ -c ]

描述:

modprobe可智能地添加和删除Linux内核模块(为简便起见,模块名中'_'和'-'是一样的)。modprobe会查看模块目录/lib/modules/'uname -r'里面的所有模块和文件,除了可选的/etc/modprobe.conf配置文件和/etc/modprobe.d目录外。

modprobe需要一个最新的modules.dep文件,可以用depmod来生成。该文件列出了每一个模块需要的其他模块,modprobe使用这个去自动添加或删除模块的依赖。

选项:

-v --verbose  显示程序在干什么,通常在出问题的情况下,modprobe才显示信息。
-C --config  重载(^_^,意思取C++的重载)默认配置文件(/etc/modprobe.conf或/etc/modprobe.d)。
-c --showconfig  输出配置文件并退出
-n --dry-run  可以和-v选项一起使用,调试非常有用
-i --ignore-install --ignore-remove 该选项会使得modprobe忽略配置文件中的,在命令行上输入的install和remove命令。
-q --quiet 一般modprobe删除或插入一个模块时,若没有找到会提示错误。使用该选项,会忽略指定的模块,并不提示任何错误信息。
-r --remove  该选项会导致modprobe去删除,而不是插入一个模块。通常没有没有理由去删除内核模块,除非是一些有bug的模块。你的内核也不一定支持模块的卸载。
-V --verssion 版本信息
-f --force  和同时使用--force-vermagic ,--force-modversion一样。使用该选项是比较危险的。
-l --list 列出所有模块
-a --all 插入所有命令行中的模块
-t --type 强制 -l 显示dirname中的模块
-s --syslog 错误信息写入syslog

modinfo

功能:显示内核模块的信息

用法:

modinfo [ -0 ] [ -F field] [modulename | filename ... ]
modinfo -V
modinfo -h

描述:

modinfo列出Linux内核中命令行指定的模块的信息。若模块名不是一个文件名,则会在/lib/modules/version 目录中搜索,就像modprobe一样。

modinfo默认情况下,为了便于阅读,以下面的格式列出模块的每个属性:fieldname : value。

选项:

-V --version 版本
-F --field 仅在一行上显示field值,这对于脚本较为有用。常用的field有:author, description, licence, param, depends, alias, filename。
-0 --NULL 使用'/0'字符分隔field值,而不是一个新行。对脚本比较有用。
-a -d -l -p -n 这些分别是author, description, license, param ,filename的简短形式。

insmod

功能:向Linux内核中插入一个模块

用法:insmod [filename] [modue options …]

描述:

insmod是一个向内核插入模块的小程序:若文件名是一个连字符’-‘,模块从标准输入输入。大多数用户使用modprobe,因为它比较智能化。

rmmod

功能:删除内核中的一模块

用法:rmmod [ -f ] [ -w ] [ -s ] [ -v ] [ modulename ]

描述:

rmmod是一个可以从内核中删除模块的小程序,大多数用户使用modprobe -r去删除模块。

选项:

-v --verbose  显示程序正在做些什么,一般只显示执行时的错误信息。
-f --force  该选项是非常危险:除非编译内核时,CONFIG_MODULE_FORCE_UNLOAD被设置该命令才有效果,否则没效果。用该选项可以删除正在被使用的模块,设计为不能删除的模块,或者标记为unsafe的模块。
-w --wait 通常,rmmod拒绝删除正在被使用的模块。使用该选项后,指定的模块会被孤立起来,直到不被使用。
-s  --syslog  将错误信息写入syslog,而不是标准错误(stderr)。
-V  --version 版本信息

以上内容是参考man翻译的,若有疑问请用man …查看原始文档,翻译有误之处还望见谅。

杂想

发表于 2009-02-02   |   分类于 心情日记

曾几何时,都不曾写过东西了,记得好像是从上大学开始吧! 以前文笔自认为还是不错的,现在远远不及以前那么有状态了。也许是人心态变了的缘故吧。以前比较单纯,现在比较浮躁;以前敢于幻想美好的东西,每每想到都会感到自己充满了力量和激情,现在想起那些美好的东西,自己就更加痛苦了,因为那些东西根本就不能实现。现在能做的也只能是在这里无病呻吟了,以缅怀逝去的美好!

昨晚拿起《叔本华散文》随便翻翻,看到里面有一篇关于写作的,提到写作有三种:先想后写,边想边写,不想也写。不想也写的是纯粹的文字垃圾;边想边写的无非也是在模仿甚至是抄袭,只是用文字记下当时大脑中的影像,很难有新东西;先想后写的东西才是有意义的,因为写作的目的是记录下经过系统思考的东西,所以逻辑比较明晰。他说的应该是比较学术的哪一类写作吧!我想我的就属于他说的不想也写,带有点边想边写。不管了,反正是想到哪里写到哪里了。

不过说实话,只要提起笔写东西,大脑里面高中时候的场景挥都挥不去。年少轻狂的年代,任何人和事都不往眼里放,人与人之间的关系也比较简单,生活目的也比较单纯!一切都是那么简单!口里之乎者也,也偶尔可以文绉绉酸一下。没事写写诗,虽然很烂,但至少是自己真实的内心写照,聊以自慰!虽然知识学的不是很深,但还是敢于和朋友一起谈天说地,乾坤宇宙,尘埃微粒无所不及。记得高中一直自己给自己写的一句话,很老套,但是在那个年代一直铭刻在心:追求卓越,雕琢世界。话虽俗套,但对自己来说确意味深长!当时的想法:追求卓越指的是人要不断提高自身以达到比较高的境界,雕琢世界强调的是人的主观能动性,去改造世界,去探求真知,去揭开“上帝的面纱”。合起来的意思也就很明白了。现在想想都觉得惭愧难当,世界没有“雕琢”成,却被世界“雕琢”成现在这样了。毫无激情,简直活着就是做一天和尚撞一天钟一样。重复,重复,无尽的重复着。痛苦,痛苦,无尽的痛苦。…

一直在学知识,但感觉那些始终不是自己的,甚至就是纯粹的记忆过程。面对浩瀚学海,真是有点无所适从了。可能是高中时候养成的学习习惯吧,凡事都要追根问底,非要从最底层理解起。往往追根的时候又会碰到许多新知识,然后又去追根,结果是忙于寻找问题和解决问题的方法,而真正的问题的系统的解决方法到最后也毫无头绪。弄的自己头昏脑胀,迷茫一片。(边想边写吧,一直在回味高中时代,现在却成为给自己找毛病了,那就继续找把,总结下,以后也好慢慢改正)。上面的也不能算是一个毛病,只是方法用错了对象,以后可要注意了。我以前是学物理的,物理的目标也就是从最表面的,最常见的事物入手,探求深层次的,本质的问题所在,属于理论型的,深层理解的越深说明对于物理掌握的越透彻。现在是干软件的,工程型的,快速达到目标,能重用的尽可能重用,不必深层理解系统低层,只要会用系统接口就一切搞定(当然这里的系统低层是比较稳定的,经过时间证明的),而我经常犯傻,有时一个API,非要找到它的实现不可,甚至深入到操作系统庞大的代码中去获取答案。结果大量时间被浪费,还把自己的头弄的比斗大。同时也可以反映出:科学的目标是提出问题和解决问题的方法,工程的目标是实现问题,解决问题(不择手段^_^);科学的精神是怀疑一切,不惜推翻重来,工程的精神是尽最大可能重用,不发明已有的车轮,甚至懒于改造。可能理解有误,不过说出的是自己的想法。

想想自己的毛病还真不少啊,实在是惭愧啊!朝秦暮楚算一个,大学期间专业是换了又换,从电子信息工程专业到LCD(电子科学与技术),一直和物理相关,但课程内容却完全不同,一个偏向与通信(工程型的),一个偏向与材料物理(理论型的),期间还一心自学理论物理,准备考研。自从大一第二学期接触C语言开始,同时迷上编程,喜欢那种主宰一切的感觉,所以计算机专业的课程也都基本上自学完成。就这样物理与编程一直是大学生活中的全部。碍于世俗,毕业时放弃了物理,选择了进入软件行业。开启了痛苦之旅!生活失去了原动力,不断审视生活的目的,往往毫无结果,更加痛苦!加之各种长大成人的烦恼迎面而来,苦不堪言!既想轰轰烈烈又想平平淡淡,处于一个极度浮躁状态! 呵呵,算是花心,罪有应得!

毛病就不想了,今天本来就有点不爽,什么都不想干,所以才在这里写。越想越不爽了,毛病以后得改,生活还得继续,以后多总结,自己的想法记录下来。就此打住!继续学习…

函数参数不确定时用cstdarg(stdarg.h)

发表于 2008-11-19   |   分类于 C/C++

用法

1
2
3
4
5
6
7
8
9
10
11
12
13
14
15
16
17
18
19
20

func( Type para1, Type para2, Type para3, ... )
{
/****** Step 1 ******/
va_list ap;
va_start( ap, para3 ); //一定要“...”之前的那个参数

/****** Step 2 ******/
//此时ap指向第一个可变参数
//调用va_arg取得里面的值

Type xx = va_arg( ap, Type );

//Type一定要相同,如:
//char *p = va_arg( ap, char *);
//int i = va_arg( ap, int );
//如果有多个参数继续调用va_arg
/****** Step 3 ******/
va_end(ap); //For robust!
}

研究

1
2
3
4
5
6
7
8
9

typedef char * va_list;
#define va_start _crt_va_start
#define va_arg _crt_va_arg
#define va_end _crt_va_end
#define _crt_va_start(ap,v) ( ap = (va_list)_ADDRESSOF(v) + _INTSIZEOF(v) )
#define _crt_va_arg(ap,t) ( *(t *)((ap += _INTSIZEOF(t)) - _INTSIZEOF(t)) )
#define _crt_va_end(ap) ( ap = (va_list)0 )
va_list argptr;

C语言的函数是从右向左压入堆栈的,调用va_start后,按定义的宏运算,_ADDRESSOF得到v所在的地址,然后这个地址加上v的大小,则使ap指向第一个可变参数如图:

栈底 高地址
| .......     
| 函数返回地址
| .......      
| 函数最后一个参数
| ....                       
| 函数第一个可变参数       <--va_start后ap指向 
| 函数最后一个固定参数
| 函数第一个固定参数 
栈顶 低地址

然后,用va_arg()取得类型t的可变参数值, 先是让ap指向下一个参数:

ap += _INTSIZEOF(t)

然后在减去_INTSIZEOF(t),使得表达式结果为ap之前的值,即当前需要得到的参数的地址,强制转换成指向此参数的类型的指针,然后用*取值最后,用va_end(ap),给ap初始化,保持健壮性。

1
2
3
4
5
6
7
8
9
10
11
12
13
14
15
16
17
18
19
20
21
22
23
24
25

#include <stdio.h>
#include <ctype.h>
#include<stdlib.h>
#include <stdarg.h>

int average( int first, ... ) //变参数函数,C++里也有
{
int count=0,i=first,sum=0;
va_list maker; //va_list 类型数据可以保存函数的所有参数,做为一个列表一样保存
va_start(maker,first); //设置列表的起始位置
while(i!=-1)
{
sum+=i;
count++;
i=va_arg(maker,int);//返回maker列表的当前值,并指向列表的下一个位置
}
return sum/count;

}

void main(void)
{
printf("Average is: %d/n", average( 2, 3, 4,4, -1 ) );
}

Linux下的stdarg.h

1
2
3
4
5
6
7
8
9
10
11
12
13
14
15
16
17
18
19
20
21
22
23
24
25
26
27
28
29
30
31
32
33
34
35
36
37
38
39
40
41
42
43
44
45

#ifndef _STDARG_H
#define _STDARG_H

typedef char *va_list; /* 定义va_list 是一个字符指针类型*/

/* Amount of space required in an argument list for an arg of type TYPE.
TYPE may alternatively be an expression whose type is used. */
/* 下面给出了类型为TYPE 的arg 参数列表所要求的空间容量。
TYPE 也可以是使用该类型的一个表达式 */

// 下面这句定义了取整后的TYPE 类型的字节长度值。是int 长度(4)的倍数。
#define __va_rounded_size(TYPE) /
(((sizeof (TYPE) + sizeof (int) - 1) / sizeof (int)) * sizeof (int))

// 下面这个函数(用宏实现)使AP 指向传给函数的可变参数表的第一个参数。
// 在第一次调用va_arg 或va_end 之前,必须首先调用该函数。
// 17 行上的__builtin_saveregs()是在gcc 的库程序libgcc2.c 中定义的,用于保存寄存器。
// 它的说明可参见gcc 手册章节“Target Description Macros”中的
// “Implementing the Varargs Macros”小节。
#ifndef __sparc__
#define va_start(AP, LASTARG) /
(AP = ((char *) &(LASTARG) + __va_rounded_size (LASTARG)))
#else
#define va_start(AP, LASTARG) /
(__builtin_saveregs (), /
AP = ((char *) &(LASTARG) + __va_rounded_size (LASTARG)))
#endif

// 下面该宏用于被调用函数完成一次正常返回。va_end 可以修改AP 使其在重新调用
// va_start 之前不能被使用。va_end 必须在va_arg 读完所有的参数后再被调用。
void va_end (va_list); /* Defined in gnulib *//* 在gnulib 中定义 */
#define va_end(AP)

// 下面该宏用于扩展表达式使其与下一个被传递参数具有相同的类型和值。
// 对于缺省值,va_arg 可以用字符、无符号字符和浮点类型。
// 在第一次使用va_arg 时,它返回表中的第一个参数,后续的每次调用都将返回表中的
// 下一个参数。这是通过先访问AP,然后把它增加以指向下一项来实现的。
// va_arg 使用TYPE 来完成访问和定位下一项,每调用一次va_arg,它就修改AP 以指示
// 表中的下一参数。
#define va_arg(AP, TYPE) /
(AP += __va_rounded_size (TYPE), /
*((TYPE *) (AP - __va_rounded_size (TYPE))))

#endif /* _STDARG_H */

字符串匹配之朴素算法和通配符扩展

发表于 2008-09-26   |   分类于 算法

字符串匹配

问题:给定一个T[1..n],P[1..m] ,T和P中的任意元素属于∑(有限的字符集合),求位移s使得 T[s+1..s+m] = P[1..m]. T 代表 Text(文本串), P代表 Pattern(匹配串)。

有多种算法可以实现,这里只介绍最简单,最容易理解,”最笨的” 朴素匹配算法:

T:t1 t2 ….tn
P:p1 p2..pm
其中(m<=n)

最容易想到的就是让P在T上一个字符一个字符的向右滑动,然后比较T的某一段时候和P想匹配,若不匹配,继续向右滑动;否则匹配成功。这样效率比较低,最坏情况下复杂度为theta((n-m+1)*m)。伪代码如下:

n <- length[T]
m <- lengthp[P]
for s=0 to n-m
     if T[s+1…s+m] = P[1…m]
           匹配成功,输出s,若只匹配第一个,则可在此退出循环。
     else
           继续匹配

对于有限的字符集下(假设个数为d),若果T和P中的字符都随机出现,则平均比较次数为(n-m+1)*(1-d^-m)/(1-d^-1) <= 2(n-m+1)。呵呵,这样看来这个“笨”的算法还算可以,不算很“笨”。

下面给出一种用回溯方法写的代码:(和strstr函数功能相同)

1
2
3
4
5
6
7
8
9
10
11
12
13
14
15
16
17
18
19
20
21
22
23
24

int index(const char * str1, const char * str2, size_t pos)
{
size_t i = pos;
size_t j = 0;
while(i < strlen(str1) && j < strlen(str2))
{
if(str1[i] == str2[j]) // matched then continue
{
++i;
++j;
}
else // unmatched then backtrace
{
i = i - j + 1;
j = 0;
}
}

if(j >= strlen(str2)) // matched and return the index
return i-strlen(str2);
else
return -1; // not found
}

举个例子就一清二楚了。

T =aababcd
P =abc

第1次:
a a b a b c d
a

匹配成功,继续下个字符的匹配,第2次:

a a b a b c d
a b

匹配失败,回溯,进行第3次:

a a b a b c d
- a

匹配成功,继续….

归纳下看:

第m次:

先假设数组开始的下标为0。

T=O O …O O O O O O O
P=      O O O O …

与P的第一个字符的下标为0,正在匹配的下标为j,此时与P[j]匹配的T的下标是i。

1) 若P[j]与T[i]匹配,则继续下一个字符的匹配,i++,j++。

2) 若P[j]与T[i]失配, 则T的下标回溯到i-j+1,P重新开始(j=0)。

若数组下标不是以0开始的,而是以一开始的,只需回溯到i=i-j+2,j=1即可。

扩展

加入匹配字符串中有通配符*,?。

可以匹配多个字符,多个连接在一起的可以认为是一个,而?只能通配一个字符。则算法可以改进为:
当P[j]是’
’时,求T与P[j+1]

匹配的第一个字符所在的下标,T的下标置为此值。然后继续循环。哈哈,语言描述能力不行啊,还是直接看代码吧:

1
2
3
4
5
6
7
8
9
10
11
12
13
14
15
16
17
18
19
20
21
22
23
24
25
26
27
28
29
30
31
32
33
34
35
36
37
38
39
40
41
42
43
44
45
46
47
48
49
50
51
52
53
54
55
56
57
58
59
60
61
62
63
64
65

/*
*decrip:match the string('*' and '?' not included) with pattern including *(se
* veral),?(only one)
*input:
* T -- text
* P -- Pattern
*return:
* true for exit ,false for not
* start,end -- the index of the pattern found in the text
*/
bool match(const char* T, const char* P, int& start, int& end)
{
size_t i = 0;
size_t j =0;
size_t n = strlen(T);
size_t m = strlen(P);
bool bStart = true;
while(i < n && j < m)
{
if(P[j] == '*') // wildcard ,then find the first position matched with next character
{
++j;
while('*' == P[j]) // "***..*" <=> "*"
++j;
while(T[i] != P[j])
++i;
if(i >= n) // finished, no matter matched or not
break;
}

if(T[i] == P[j] || '?' == P[j])
{
if(bStart) // new loop start
{
start = i;
bStart = false;
}
++i;
++j;

if(j == m) // match finish
end = i-1;
}
else // unmatched ,then backtrace(start a new loop)
{
static size_t ipp = 0;
++ipp;
i = ipp;
j = 0;
bStart = true;
}
}

if(j >= m) // succeeded to find the pattern
{
if( '*' == P[0]) // postfix
start = 0;
if( '*' == P[m-1]) // prefix
end = n-1;
return true;
}
else
return false;
}

备注

  1. 以上内容,朴素算法伪代码参考《算法导论》。
  2. 回溯程序是看了一位网上哥们的伪代码写的。
  3. 通配符扩展是参考1),2),自己分析写的。

已知进程句柄,如何知道此进程的主窗口句柄

发表于 2008-06-11   |   分类于 Windows

已知进程句柄,如何知道此进程的主窗口句柄,在此说明两种方法:

  1. 调用FindWindow(),前提是必须知道该进程中窗口类名和窗口名,返回后的句柄可以通过IsWindow()函数来验证是否是有效的窗口句柄.
1
2
3
4
5
6

HWND hWnd = ::FindWindow(szClassName, szWndName);
if(::IsWindow(hWnd))
{
// 处理该窗口
}

2.先枚举全部窗口,再枚举回调函数中调用GetWindowThreadProcessID()得到窗口得进程ID,再与以前得到得ID比较.如果不一致,不处理,若一致,循环调用GetParent()一直到返回NULL, 最后得hwnd即为顶层窗口句柄

1
2
3
4
5
6
7
8
9
10
11
12
13
14
15
16
17
18
19
20
21
22
23
24
25
26
27
28
29
30
31
32
33
34
35
36
37
38
39
40
41
BOOL   CALLBACK   EnumWindowsProc(HWND   hwnd,       LPARAM   lParam   )     
{
unsigned long id;
HWND thwnd;

id=GetWindowThreadProcessId(hwnd,NULL);
if (id==lParam)
{
while((thwnd=GetParent(hwnd))!=NULL)
hwnd=thwnd;
CString x;
x.Format("HWND = %x",hwnd);
MessageBox(NULL,x,NULL,MB_OK);
return false;
}
return true;
}


void CMt2Dlg::OnButton1()
{
// TODO: Add your control notification handler code here
STARTUPINFO StartInfo;
PROCESS_INFORMATION ProceInfo;
ZeroMemory(&StartInfo,sizeof(StartInfo));
StartInfo.cb=sizeof(StartInfo);

CreateProcess(NULL, //lpApplicationName: PChar
"calc.exe", //lpCommandLine: PChar
NULL, //lpProcessAttributes: PSecurityAttributes
NULL, //lpThreadAttributes: PSecurityAttributes
true, //bInheritHandles: BOOL
CREATE_NEW_CONSOLE,
NULL,
NULL,
&StartInfo,
&ProceInfo);

Sleep(100); //这是必须的,因为 CreateProcess 不能马上Active windows
EnumWindows(EnumWindowsProc,ProceInfo.dwThreadId);
}

一个用于显示数值曲线的类

发表于 2008-06-06   |   分类于 Windows

最近在做一个课题,要显示几条数值曲线。不过不想借助其它控件,或其它公司提供的开发包,如MATCOM,用这些的话就太简单不过了。下面是一个自己设计的一个类,用API堆的,这样既可以在基于SDK应用开发应用,又可以在MFC框架中应用。下面几个图是测试时截的。在此声明一下,我是一新手,难免设计的不合理甚至错误百出,敬请见谅!点此下载源代码和示例代码(http://download.csdn.net/detail/future_fighter/485567)。

显示多条曲线

图1 显示多条曲线

显示坐标提示

图2 显示坐标提示

坐标系显示范围缩放

图3 坐标系显示范围缩放

类名为CChart,其基类为CChartBase。CChartBase主要用于显示,设置坐标系的一些属性,比如x,y轴可以显示的范围、坐标系边框颜色、背景颜色等;而CChart则用于显示坐标系和多条曲线,曲线颜色、线宽、等凡是可见的属性都可以设定。用法如下:

1. 将DispChart.h和DispChart.cpp包含至用使用该类的Project中,若为基于MFC项目,则在DispChart.cpp中添加#include ”stdafx.h”。

2. 定义一个该类的变量,CChart chart(hWnd); hWnd是该坐标所在窗口的句柄。

3. (可选)设置相应的属性。如:

1
2
3
4
5
6
7
8
9
10

chart.SetGridColor(RGB(255,0,0)); // 设置网格颜色
chart.SetGriddx(10); // 设置网格x轴间隔
chart.SetClrLabel(RGB(0,0,255)); // 标尺颜色
chart.SetXLabel("t/min"); // 轴标文字
chart.SetYLabel("V/v");
chart.SetRulerXFormat("%.2f"); // x轴标尺显示精度
chart.SetGriddy( 0.01);
chart.SetXRange( 0, 100); // x轴可以显示的范围
chart.SetYRange( -5, 5);

4. 添加曲线数据连接,曲线数据必须是vector型的。如:

1
2
3
4
5
6
7
8
9
10
11
12
13
14
15
16
17
18
19

std::vector<double> data[3];
int length = 1000;
double amp = 5;
for(int i=0;i<length;i++)
{
double t = (20 * 3.1415926 / length) * i;
double y1 = amp*sin(t);
double y2 = (amp/2)*cos(t);
data[0].push_back(t);
data[1].push_back(y1);
data[2].push_back(y2);
}
chart.AddMCurves(data,3);
chart.SetCurveColor(0,RGB(0,0,0));
```


5. 在WM_PAINT消息或其它地方绘制曲线。先设置显示在那个位置,然后绘制。

case WM_PAINT:
hdc = BeginPaint(hWnd, &ps);
// TODO: 在此添加任意绘图代码..
RECT rect;
GetClientRect(hWnd,&rect);

chart.SetChartDC(hdc);  

chart.SetChartAndWindowPosition(rect);  

 chart.ShowCurves();  

EndPaint(hWnd, &ps);  
break;  
1
2
 
6. (可选)若要动态缩放、平移、左键点击显示坐标提示窗口、右键框选缩放,则只需在相应的消息处理处添加相关操作即可。注意:由于我是用该类绘制周期性的曲线的,所以平移和缩放只是x轴的;若要同时平移或缩放,在CChart::OnMouseWheel函数中将ScaleX改变为ScaleCenter即可以完成x,y轴同时缩放,在CChart::OnMouseMove函数中修改Move的第二参数为-(y - m_ptLeftButtonDown.y) * GetYPerPix()即可以完成x,y轴同时移动。

if( m_ptLeftButtonDown.x != -1)
{
Move( -(x - m_ptLeftButtonDown.x) GetXPerPix() , -(y - m_ptLeftButtonDown.y) GetYPerPix());

m_ptLeftButtonDown.x = x;
m_ptLeftButtonDown.y = y;

// 绘制曲线和坐标系
ShowCurves();
}

1
2

示例代码:

case WM_LBUTTONDOWN:

    chart.OnLeftButtonDown(LOWORD(lParam), HIWORD(lParam));  
    break;  
case WM_LBUTTONUP:  
    chart.OnLeftButtonUp(LOWORD(lParam), HIWORD(lParam));  
    break;  
case WM_RBUTTONDOWN:  
    chart.OnRightButtonDown(LOWORD(lParam), HIWORD(lParam));  
    break;  
case WM_RBUTTONUP:  
    chart.OnRightButtonUp(LOWORD(lParam), HIWORD(lParam));  
    break;  
case WM_MOUSEMOVE:  
    chart.OnMouseMove(LOWORD(lParam), HIWORD(lParam));  
    break;  
case 0x020A/*WM_MOUSEWHEEL*/:  
    {  
        POINT pt = { LOWORD(lParam), HIWORD(lParam) };  
        ScreenToClient( hWnd,&pt );  
        chart.OnMouseWheel(wParam, pt.x, pt.y);  
    }  
    break;  
1
2


#ifndef _DISPCHART_H

#define _DISPCHART_H

#include <windows.h></windows.h>

#include

#include

// 图表基类:用于绘制坐标系和曲线
class CChartBase
{
protected:
HDC m_hChartDC; // 图表绘制的DC
RECT m_rtWindow; // 坐标窗口,其中包含图表显示区和坐标标尺,轴标等
RECT m_rtChart; // 图标显示区(依赖域m_rtWindow)

// 坐标显示边界  
double    m_xStart;         // 实数域内x轴起点  
double    m_xEnd;           //         x轴终点  
double    m_yStart;         //         y轴起点  
double    m_yEnd;           //         y轴终点  

// 显示图表区  
COLORREF  m_clrChartBg;     // 显示区背景色  
COLORREF  m_clrChartBorder; //       边框色  

// 网格  
bool      m_bGridOn;        // 控制网格是否显示  
double    m_dxGrid;         // 网格单元宽  
double    m_dyGrid;         // 网格单元高  
COLORREF  m_clrGrid;        // 网格线颜色  

// 坐标轴,轴标,标尺  
char      m_xLabel[20];  
char      m_yLabel[20];  
bool      m_bxLabelOn;   
bool      m_byLabelOn;  

bool      m_bxRulerOn;  
bool      m_byRulerOn;  
char      m_szRulerXFormat[128];  
char      m_szRulerYFormat[128];  

COLORREF  m_clrLabel;      // 轴标文字和刻度文字颜色  

// 文字字体  
LOGFONT     m_logFont;  

// 曲线数据  

public:

// 辅助函数  
void SetChartDC(HDC hdc);  
HDC  GetChartDC() const ;  
void SetChartWindowPosition(RECT rect);  
void SetChartWindowPosition(int left, int top, int right, int bottom);  
RECT GetChartWindowPosition() const;  
void SetChartPosition(RECT rect);  
void SetChartPosition(int left, int top, int right, int bottom);  

RECT GetChartPosition() const;  
int  GetChartWidth()const  { return m_rtChart.right - m_rtChart.left ; };  
int  GetChartHeight()const { return m_rtChart.bottom - m_rtChart.top ; };  
int  GetChartWindowWidth() const { return m_rtWindow.right - m_rtWindow.left; };  
int  GetChartWindowHeight() const{ return m_rtWindow.bottom - m_rtWindow.top; };  

// 坐标显示边界  
double SetXStart(double xStart);  
double SetXEnd(double xEnd);  
void   SetXRange(double xStart,double xEnd);  
double SetYStart(double yStart);  
double SetYEnd(double yEnd);  
void   SetYRange(double yStart,double yEnd);  
double GetXStart()const;  
double GetXEnd()const;  
double GetYStart()const;  
double GetYEnd()const;  

// 显示图表区  
void      SetClrChartBg(COLORREF clr);  
COLORREF  GetClrChartGb()const;  
void      SetClrChartBorder(COLORREF clr);  
COLORREF  GetClrChartBorder()const;  

// 网格  
double   SetGriddx(double dxGrid);              // 设置网格宽度,返回前一个值  
double   SetGriddy(double dyGrid);              // 设置网格高度,返回前一个值  
void     SetGridxy(double dxGrid,double dyGrid);  
COLORREF SetGridColor(COLORREF color);          // 设置网格颜色,返回前一个值  
void SetGridOn();                               // 设置网格为显示状态  
void SetGridOff();                              // 设置网格为关闭状态  

double   GetGriddx()const;  
double   GetGriddy()const;  
COLORREF GetGridColor()const;  
bool     GetGridStatus()const;  

// 坐标轴,轴标,标尺  
void    SetXLabel(const char* xLabel);  
void    SetYLabel(const char* yLabel);  
void    SetXLabelOn();  
void    SetXLabelOff();  
BOOL    GetXLabelStatus()const;  
void    SetYLabelOn();  
void    SetYLabelOff();  
BOOL    GetYLabelStatus()const;  

void    SetXRulerOn();  
void    SetXRulerOff();  
BOOL    GetXRulerStatus()const;  
void    SetYRulerOn();  
void    SetYRulerOff();  
BOOL    GetYRulerStatus()const;  

void    SetRulerXFormat(const char str[]) { strcpy(m_szRulerXFormat, str);};  
void    SetRulerYFormat(const char str[]) { strcpy(m_szRulerXFormat, str);};  

void     SetClrLabel(COLORREF clr);  
COLORREF GetClrLabel()const;  

// 字体  
void    SetLogFont(LOGFONT logFont);  
LOGFONT GetLogFont()const;  


// 每一个象素所代表的实数值  
double GetYPerPix() const;  
double GetXPerPix() const;  

protected:
int ShowChartBg();
int ShowGrid();
int ShowRuler();
int ShowLabel();

public:
CChartBase();
~CChartBase();

int ShowAt(int left, int top, int right, int bottom); // 在rect中显示该图标窗口,外部最好用该函数  
int ShowAt(RECT rect);  
int Show();                                           // 通过设置各种参数显示  

// 坐标转换 r--real  s--screen 2--to  
int rx2sx(double rx);    
int ry2sy(double ry);  
double sx2rx(int sx);  
double sy2ry(int sy);  

// 坐标变换  
void Move(double drx, double dry);                   // 坐标系平移  
void ScaleCenter(double times);                      // 坐标以坐标框的中心放缩  
                                                     // times>1时,显示范围扩大,起到缩小的作用  
                                                     // times<1时,显示范围缩小,起到放大的作用  
void ScaleX(double times);                           // X轴范围缩放(以x轴中心)  
void ScaleY(double times);                           // Y轴范围缩放(以y轴中心)  

};

class CChart:public CChartBase
{
private:
HWND m_hWnd; // 图表所在的窗口,该窗口可以处理消息(用于实现坐标变换等)
HDC m_memDCWindow; // 存储整个绘图窗用的内存句柄
HBITMAP m_bmpInDCWindow;
HDC m_memDCChart; // 存储chart的内存设备句柄
HBITMAP m_bmpInDCChart; // 图表所对应的位图句柄

// 曲线数据  

public:

std::vector  

`

位图文件的打开和保存

发表于 2008-05-24   |   分类于 Windows

下面是两个函数, SaveBmp函数用于设备相关位图(DIB)保存为bmp格式的文件。DrawBitmapFile则用于将bmp格式的文件打开并显示在指定的设备环境上。

1
2
3
4
5
6
7
8
9
10
11
12
13
14
15
16
17
18
19
20
21
22
23
24
25
26
27
28
29
30
31
32
33
34
35
36
37
38
39
40
41
42
43
44
45
46
47
48
49
50
51
52
53
54
55
56
57
58
59
60
61
62
63
64
65
66
67
68
69
70
71
72
73
74
75
76
77
78
79
80
81
82
83
84
85
86
87
88
89
90
91
92
93
94
95
96
97
98
99
100

BOOL SaveBmp(HBITMAP hBitmap, const char *FileName)
{
HDC hDC;
//当前分辨率下每象素所占字节数
int iBits;
//位图中每象素所占字节数
WORD wBitCount;
//定义调色板大小,位图中像素字节大小,位图文件大小,写入文件字节数
DWORD dwPaletteSize=0,dwBmBitsSize=0, dwDIBSize=0, dwWritten=0;
//位图属性结构
BITMAP Bitmap;
//位图文件头结构
BITMAPFILEHEADER bmfHdr;
//位图信息头结构
BITMAPINFOHEADER bi;
//指向位图信息头结构
LPBITMAPINFOHEADER lpbi;
//定义文件,分配内存句柄,调色板句柄
HANDLE fh,hDib,hPal,hOldPal=NULL;

//计算位图文件每个像素所占字节数
hDC=::CreateDC("DISPLAY",NULL, NULL, NULL);
iBits=::GetDeviceCaps(hDC,BITSPIXEL)* ::GetDeviceCaps(hDC,PLANES);
::DeleteDC(hDC);

if(iBits <= 1)
wBitCount = 1;
else if(iBits <= 4)
wBitCount = 4;
else if(iBits <= 8)
wBitCount = 8;
else wBitCount = 24;

::GetObject(hBitmap,sizeof(Bitmap),(LPSTR)&Bitmap);
bi.biSize = sizeof(BITMAPINFOHEADER);
bi.biWidth = Bitmap.bmWidth;
bi.biHeight = Bitmap.bmHeight;
bi.biPlanes = 1;
bi.biBitCount = wBitCount;
bi.biCompression = BI_RGB;
bi.biSizeImage = 0;
bi.biXPelsPerMeter = 0;
bi.biYPelsPerMeter = 0;
bi.biClrImportant = 0;
bi.biClrUsed = 0;

dwBmBitsSize = ((Bitmap.bmWidth * wBitCount + 31) / 32) * 4 * Bitmap.bmHeight;

//为位图内容分配内存
hDib = ::GlobalAlloc(GHND,dwBmBitsSize + dwPaletteSize + sizeof(BITMAPINFOHEADER));
lpbi =(LPBITMAPINFOHEADER)::GlobalLock(hDib);
*lpbi = bi;

// 处理调色板
hPal = GetStockObject(DEFAULT_PALETTE);
if(hPal)
{
hDC = ::GetDC(NULL);
hOldPal = ::SelectPalette(hDC,(HPALETTE)hPal,FALSE);
RealizePalette(hDC);
}

// 获取该调色板下新的像素值
GetDIBits(hDC,hBitmap,0,(UINT)Bitmap.bmHeight,(LPSTR)lpbi + sizeof(BITMAPINFOHEADER) +dwPaletteSize,
(BITMAPINFO*)lpbi,DIB_RGB_COLORS);

//恢复调色板
if (hOldPal)
{
::SelectPalette(hDC, (HPALETTE)hOldPal, TRUE);
RealizePalette(hDC);
::ReleaseDC(NULL,hDC);
}

//创建位图文件
fh = CreateFile(FileName,GENERIC_WRITE,0,NULL,CREATE_ALWAYS,
FILE_ATTRIBUTE_NORMAL|FILE_FLAG_SEQUENTIAL_SCAN,NULL);

if(fh == INVALID_HANDLE_VALUE)
return FALSE;

// 设置位图文件头
bmfHdr.bfType = 0x4D42; // "BM"
dwDIBSize = sizeof(BITMAPFILEHEADER) + sizeof(BITMAPINFOHEADER) + dwPaletteSize + dwBmBitsSize;
bmfHdr.bfSize = dwDIBSize;
bmfHdr.bfReserved1 = 0;
bmfHdr.bfReserved2 = 0;
bmfHdr.bfOffBits = (DWORD)sizeof(BITMAPFILEHEADER) + (DWORD)sizeof(BITMAPINFOHEADER) + dwPaletteSize;
// 写入位图文件头
WriteFile(fh,(LPSTR)&bmfHdr,sizeof(BITMAPFILEHEADER),&dwWritten,NULL);
// 写入位图文件其余内容
WriteFile(fh,(LPSTR)lpbi,dwDIBSize,&dwWritten,NULL);
//清除
GlobalUnlock(hDib);
GlobalFree(hDib);
CloseHandle(fh);

return TRUE;
}
1
2
3
4
5
6
7
8
9
10
11
12
13
14
15
16
17
18
19
20
21
22
23
24
25
26
27
28
29
30
31
32
33
34
35
36
37
38
39
40
41
42
43
44
45
46
47
48
49
50
51
52
53
54
  
BOOL DrawBitmapFile(HDC hdc, int left, int top, char *szFilename)
{
// 打开要映射的位图文件
HANDLE hFile = CreateFile( szFilename, GENERIC_READ, FILE_SHARE_READ,
NULL, OPEN_EXISTING, FILE_ATTRIBUTE_NORMAL , NULL ) ;
if( hFile == INVALID_HANDLE_VALUE )
return FALSE ;

// 创建内存映象对象
HANDLE hMap = CreateFileMapping( hFile , NULL, PAGE_READONLY, NULL, NULL, NULL ) ;

// 映射整个位图文件到内存,返回内存的首地址
LPVOID lpBase = MapViewOfFile( hMap , FILE_MAP_READ, 0, 0, 0 ) ;

// 获取BMP文件信息
BITMAPFILEHEADER *pFileHeader ;
BITMAPINFO *pInfoHeader ;

// 获取位图象素
pFileHeader = (BITMAPFILEHEADER *) lpBase ;
if( pFileHeader->bfType != MAKEWORD( 'B' , 'M' ) )
{
UnmapViewOfFile( lpBase ) ;
CloseHandle( hMap ) ;
CloseHandle( hFile ) ;
return FALSE ;
}

BYTE *pBits = (BYTE *)lpBase + pFileHeader->bfOffBits ;

// 获取文件大小
pInfoHeader = (BITMAPINFO *)( (BYTE *)lpBase + sizeof(BITMAPFILEHEADER) ) ;
LONG width = pInfoHeader->bmiHeader.biHeight ;
LONG height = pInfoHeader->bmiHeader.biWidth ;

// 显示位图文件至hdc指定的设备
HDC hMemDC = CreateCompatibleDC( hdc ) ;
HBITMAP hBitmap = CreateCompatibleBitmap( hdc, width, height ) ;
SelectObject( hMemDC, hBitmap ) ;

// 把图象数据放到建立的内存设备中
int nRet = SetDIBitsToDevice( hMemDC, 0, 0, width, height,
0, 0, 0, height , pBits, pInfoHeader, DIB_RGB_COLORS ) ;

// 绘制图象到hdc中
BitBlt( hdc, left, top, width, height, hMemDC , 0 , 0, SRCCOPY ) ;

DeleteObject( hBitmap ) ;
UnmapViewOfFile( lpBase ) ;
DeleteDC ( hMemDC ) ;
CloseHandle( hMap ) ;
CloseHandle( hFile ) ;
}

内存映射文件

发表于 2008-05-24   |   分类于 Windows

与虚拟内存一样,内存映射文件可以用来保留一个地址空间的区域,并将物理存储器提交给该区域。它们之间的差别是,物理存储器来自一个已经位于磁盘上的文件,而不是系统的页文件。一旦该文件被映射,就可以访问它,就像整个文件已经加载内存一样。

内存映射文件

内存映射文件可以用于3个不同的目的:

  • 系统使用内存映射文件,以便加载和执行. e x e和D L L文件。这可以大大节省页文件空间和应用程序启动运行所需的时间。
  • 可以使用内存映射文件来访问磁盘上的数据文件。这使你可以不必对文件执行I / O操作,并且可以不必对文件内容进行缓存。
  • 可以使用内存映射文件,使同一台计算机上运行的多个进程能够相互之间共享数据。Wi n d o w s确实提供了其他一些方法,以便在进程之间进行数据通信,但是这些方法都是使用内存映射文件来实现的,这使得内存映射文件成为单个计算机上的多个进程互相进行通信的最有效的方法。

一.内存映射文件的函数包括

CreateFileMapping , OpenFileMapping, MapViewOfFile, UnmapViewOfFile 和 FlushViewOfFile。

用法如下:

1.

HANDLE CreateFileMapping(
HANDLE hFile, // 一个文件句柄
LPSECURITY_ATTRIBUTE lpAttributes, // 定义内存映射文件对象是否可以被承
DWORD flProtect, // 该内存映射文件的保护类型
DWORD dwMaximumSizeHigh,// 内存映射文件的长度
DWORD dwMaximumSizeLow, //
LPCTSTR lpName // 内存映射文件的名字
)

hFile 指定要映射的文件的句柄,如果这是一个已经打开的文件的句柄(CreateFile函数的返回值),那么将建立这个文件的内存映射文件,如果这个参数为1,则建立共享内存。
lpAttribute 安全属性,一般设为NULL
flProtect 指定映射文件的保护类型,它的取值可以是PAGE_READONLY(内存页面只读) 或 PAGE_READWRITE(内存页面可读写)。
dwMaximumSizeHigh 和 dwMaximumSizeLow参数组合指定了一个64位的内存映射文件的长度。一种简单的方法是将这两个参数全部设置为0,那么内存映射文件的大小将与磁盘文件大小一致。

2.

HANDLE OpenFileMapping(
DWORD dwDesiredAccess, // 指定保护类型
BOOL bIsInheritHandle, // 返回的句柄是否可以被继承
LPCSTR lpName // 创建对象时使用的名字
)

如果创建的是共享内存,其他进程不能再使用CreateFileMapping函数去创建同名的内存映射文件对象,而要使用OpenFileMapping函数打开已创建好的对象。

dwDesiredAcess 指定保护类型有FILE_MAP_WRITE 或FILE_MAP_READ

3.

LPVOID MapViewOfFile(
HANDLE hFileMappingObject, // 前两个函数返回的内存映射文件的句柄
DWORD dwDesiredAcess, // 保护类型FILE_MAP_READ ,FILE_MAP_WRITE
DWORD dwFileOffsetHight, // 从文件的那个地址开始映射
DWORD dwFileOffsetLow,
SIZE_T dwNumberOfBytesToMap // 要映射的字节数,为0则映射整个文件
)

4.

BOOL UnmapViewOfFile( LPCVOID lpBaseAddress )

当不再使用内存映射文件时,可以通过UmmapViewOfFile函数撤销映射并使用CloseHandle函数关闭内存映射文件的句柄。

5.

BOOL FlushViewOfFile(
LPCVOID lpBaseAddress, // 开始的地址
SIZE_T dwNumberOfBytesToFlush // 数据块的大小
)

如果修改了映射视图中的内存,系统会在试图撤销映射或文件映射对象被删除时自动将数据写到磁盘上,但程序也可以根据需要将视图中的数据立即写到磁盘上。

二.使用步骤

1. 使用CreateFileMapping创建一个内存映射文件内核对象,告诉操作系统内存映射文件需要的物理内存大小,这个步骤决定了内存映射文件的用途――究竟是为磁盘上的文件建立内存映射还是为多个进程共享数据建立共享内存。或者使用OpenFileMapping打开映射文件内核对象。

2. 映射文件映射对象的全部或一部分到进程的地址空间,可以认为该操作是为文件中的内容分配线型地址空间,并将线型地址和文件内容对应起来,完成该操作的函数是MapViewOfFile。

三.使用内存映射文件读文件的具体过程可以这样:

(1)调用CreateFile函数打开想要映射的文件,得到文件句柄hFile。

(2)调用CreateFileMapping函数,并传入文件句柄hFile,为该文件创建一个内存映射内核对象,得到内存映射文件的句柄hMap。

(3)调用MapViewOfFile函数映射整个文件或一部分到进程的虚拟地址空间。该函数返回文件映射到内存后的起始地址。使用指向这个地址的指针就可以读取文件的内容了。

(4)调用UnmapViewOfFile函数来解除文件映射。

(5)调用CloseHandle函数关闭文件对象,必须传入内存映射文件句柄hMap

(6)调用CloseHandle函数关闭文件对象,必须传入文件句柄hFile。

四.进程间共享内存:

共享内存主要是通过映射机制实现的。Windows下进程的地址空间是相互隔离的,但在物理上却是重叠的。所谓的重叠是指同一块内存区域可能被多个进程同时使用。当调用CreateFileMapping创建命名的内存映射文件对象时,Windows即在物理内存中申请了一块指定大小的内存区域,返回文件映射对象的新句柄hMap。为了能够访问这块区域必须调MapViewOfiFile函数,促使Windows将此内存空间映射到进程的地址空间中。当在其他进程中访问这块区域时,则必须使用OpenFileMapping函数来取得对象句柄hMap,并调用MapViewOfFile函数得到此内存空间的一个映射。这样一来,系统就把同一块内存区域映射到了不同进程的地址空间中,从而达到共享内存的目的。

1…10111213
David++

David++

123 日志
25 分类
65 标签
RSS
GitHub 知乎 微博 豆瓣
© 2007 - 2021 David++
由 Hexo 强力驱动
主题 - NexT.Pisces